Showing posts with label Fondant. Show all posts

Wednesday, 22 April 2015

How to make embossed teddy bear fondant cupcake toppers

0 comments


I loved making the fondant. So I came up with these sweet teddy bear cupcake toppers. I have made them in pink and blue and they are just perfect for a baby shower.

This is what I use:
Rolled fondant icing
Tylo powder
Rolling pin
Tylo glue
Small brush
Gel paste colors
Small blossom cutter with ejector (PME)
Teddy bear embosser from the Cradle 3D set (PatchWork Cutters)
Round cookie cutter (40mm)
Round scallop cookie cutter 2 1/4″ (58mm)
Round Piping tip no 2
Round piping tip with a 10mm opening
A little cornstarch for dusting and a small knife (not showing) if you want to make the tiny leaves on the girl cupcake toppers

Start adding some tylo powder to your white base. This will help the cupcake toppers to hold the shape better when they are placed in the frosting.

Step 1:
Roll out the white fondant to a 3 mm thickness and cut out circles with the scallop cookie cutter. Place them on a lightly cornstarch dusted tray as you go.
Step 2:
Take the round piping tip and “cut out” a small hole in each of the scallops.

Step 3:
Use another color of rolled fondant for the center of the cupcake toppers and roll out the fondant to a 2mm thickness. Cut out circles with the 40mm cookie cutter.

Step 4:
Use the large teddy bear embosser from the Patchwork cutter Cradle set and emboss the “center circle”.

Step 5:
Next brush a little tylo glue on the back of the embossed circle and place it in the middle of the white base.

Step 6:
If you like, you can glue on a couple of small blossoms and tiny leaves for the girl cupcake toppers.

TIP! I make the leaves out of tiny pieces of rolled fondant. Roll them into a small tear drop shape and make a little vein with a small knife.

Step 7:
For the boys, I have made a small ball. Roll out your fondant thinly. Use the round piping tip with the 10mm opening and cut out some dots. Use the end of the no 2 piping tip and emboss the middle of the ball.

Step 8:
Attache the small ball with a little brush of tylo glue.

Let the cupcake toppers dry thoroughly before use.

Happy Caking!

Tuesday, 21 April 2015

How To Make Tiny Flower Pot Cakes

0 comments

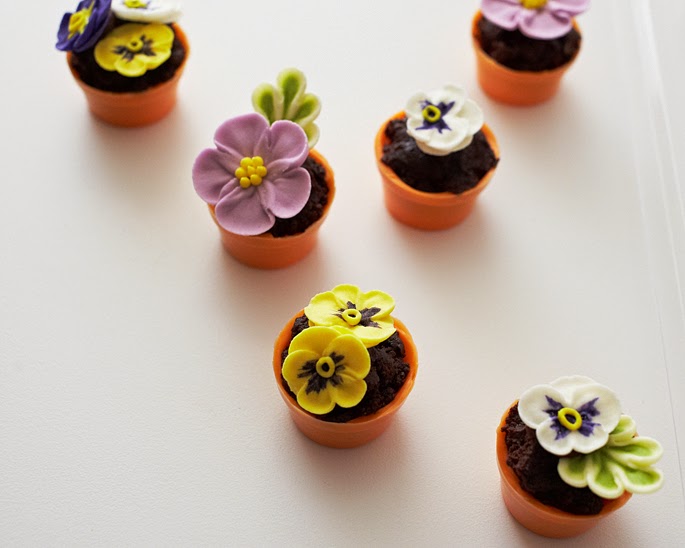
Sometimes you want to create a dessert that is both a show stopper and is deceptively easy. Well, these teeny weeny flower pot cake bites are just the thing.

Using a chocolate mold makes them fool proof and dirt “brownie” filling tricks the eye but couldn’t be simpler. Use pre made royal icing flowers for the topper or pipe your own if you’re feeling ambitious. Either way, it’s the perfect treat to wow your guests.

Here’s what you’ll need:

Flower Pot Chocolate Mold
Orange Candy Coating Discs
Paintbrush
Store Bought Brownies (with no icing) or Chocolate Cake Pop Filling
Chocolate Store Bought Icing in a Piping Bag
Ready-to-Use Royal Icing Flowers or Fondant Flowers

Paint And Fill The Pots

Start by crumbling up the brownies and set them aside in a bowl.


Then, in a microwave safe bowl, heat some orange candy coating discs on half power. Remove after 30 seconds and stir. Continue to heat and stir in 30 second intervals until the discs are melted. (Be careful to not overheat the discs because they will burn).


Use a paintbrush to coat each cavity of the flower pot mold. Use a dabbing motion if paint strokes are leaving too many thin spots. (Reheat the coating as necessary because it may get firm if you are working slowly).

Place the mold in the fridge for 5 minutes. Remove it from the fridge, hold it up to the light and then touch up any thin spots with additional coating so that you have a solid shell to put filling in.


On the back of your royal icing flower, pipe a dollop of icing and then adhere the flower to the top of the cake. Accent with leaves or additional flowers.


And there you have it! Cutie and Yummy... Happy Caking!


Source: thecakegirls

Wednesday, 18 March 2015

How to make a simple ribbon rose fondant

0 comments
Here’s what you’ll need… and the list is short today :) :

Work Mat
Shortening (to prevent sticking)
Fondant (I’m using pink)
Small rolling pin
Ribbon cutter
Scalpal or Xacto blade
Once you have all of your tools and materials gathered, you can get started immediately!
Step 1: Start by rubbing down your work surface with a thin layer of shortening to prevent sticking. Once it’s ready, roll out your fondant into a long rope or snake.  The length and diameter of your rope will depend on how large of a rose you want to make.


For the roses that I’m making in this tutorial (to go on a cupcake), the rope is about 10 inches long and less than an inch in diameter.

Step 2: Using your small rolling pin to flatten the rope.  I like to make mine no more than 1/8th of an inch thick.


Step 3: Once you have it rolled out evenly, set your ribbon cutter to the width of the ribbon you’d like to cut and simply roll over it to cut the ribbon!  You could also do this with a ruler and pastry cutter, but I use my ribbon cutter almost every week for cake projects and I highly recommend having one!


For these flowers, I had the ribbon width set to about 1 inch.  For smaller flowers, you could make the ribbons narrower.  Once the ribbon is cut, use the scalpel to cut the ends off even/straight (not pictured).

Step 4: Start at one one of the fondant ribbon and begin rolling it up.  I like to keep them tight in the center.

Step 5: After making a few loops, I begin to loosen it up at the top by pinching it on the bottom – this causes the top of the ribbons to flair out a bit.

Step 6: Keep rolling and pinching until you have the size flower that you want.   I wanted flowers to cover the top of my cupcake, so I made them a little larger:

There you have it, nice and easy. Feel free to share your project and I'll be glad to check them out. Happy Baking!

PHOTO CREDIT: CakeJournal

Sunday, 15 February 2015

ROLLED FONDANT

0 comments
The History of Rolled Fondant

So where did rolled fondant come from? I have been searching for the origin of rolled fondant for weeks now…  It had come up in conversation with a fellow decorator.  My initial guess was that maybe it was somehow related to fruit cake or marzipan.

I was delighted when my copy of  “Professional Cake Decorating” by Toba Garrett arrived in the mail, and it described, with the most detail so far, the invention of rolled fondant.  Not only does her book describe the development of icing, but also goes into detail about the development of the cake, as well as the development of piping and decorating.

This is the excerpt from her book “Professional Cake Decorating”, by Toba Garrett:

“From the seventeenth to the nineteenth centuries, the term icing usually meant that the cake was marzipan.  Marzipan was chiefly a celebration food, considered both a substance and a delicious confection.  As a substance, it was paired with sugar paste (also known as rolled fondant), and it could be shaped, sculpted, or molded into beautiful centerpieces.  It could be rolled, cut, stamped out, or dried, and candied fruits or spices could be added to it.  It could also be iced with glaze and dried in a warm oven before further garnishing.  Icing continued to evolve until the mid- to late nineteenth century, when royal icing was accepted and the art of piping began.

The early stages of sugar paste (rolled fondant) developed as early as 1558.  The recipe included rosewater, sugar, lemon juice, egg white, and gum tragacanth, them called gum dragon.  This vegetable compound is still used in commercial rolled fondant today.”

Fondant Icing

There are different types of fondant icing, only rolled fondant icing is covered in this guide.  Rolled fondant icing is also known as sugar paste.  The softer, more molded look of fondant icing is often used for birthday and novelty cakes.  Fondant icing is popular with professional and home cake decorators due to its ease of use, it can be applied in one layer and rolled fondant can be bought ready made.  Knead well until smooth and pliable, roll to the required shape and thickness.  It can be frozen, but must be allowed to defrost naturally.  The icing can be flavored using the essences and/or colored using the liquid, paste or powder dusting colors.  To add the coloring use a cocktail stick, adding a little at a time to achieve the desired shade.  Too much coloring or flavoring will make the paste sticky.  Powder colors seem to fade less.

The icing can be easily molded into flowers, animals and other shapes – once molded it will dry and retain its shape.  However, after a period of time the shapes can soften as the glycerin content attracts moisture so it should only be used on decorations that are to be consumed quickly.
Glycerine maybe added to rolled fondant if it is too dry or seems like an elephant skin texture.  If glycerine doesn't work, then try a little shortening.  You have to play with fondant texture, depending on the climate and weather. 

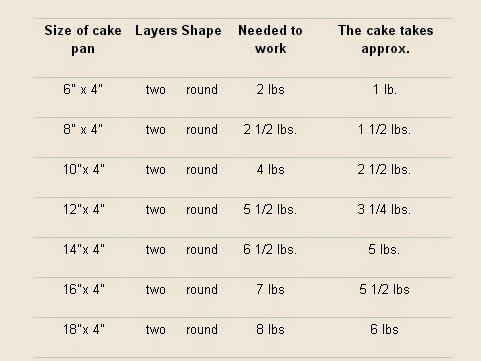
Rolled Fondant Icing Chart  This is just a guideline – not a set rule. You must work more fondant than you actually need on the cake to allow enough to hang free to work with for smoothing. The icing on the sides of the layers should be smoothed and gently stretched where necessary to conform to the shape of each individual cake. There should be no folds or creases in the fondant unless that particular effect is desired.

Beginning with the largest cake first and finishing with the smallest cakes allows you to rework the left over trimmings from each cake on the next tier (be sure and remove any crumbs before kneading with other fondant. Buttercream icing will knead into the fondant without any problem. 


Applying Fondant to Cake

Most fondant covered cakes are first covered with a layer of marzipan, this allows for a very smooth, straight edged cake.  Today most decorators will use buttercream which will sag as a cake sits. I prefer using whipped ganache in which gives a wonderful flavor when cutting the cakes. 
To cover a cake with fondant: Dust a clean pastry cloth, or a smooth, clean surface, with mixture of 50% cornstarch and 50% confectioners’ sugar;  roll the fondant with a rolling pin until it is approximately 1/8 to 1/4 inch thick, depends on brand types of fondant using. Make sure the fondant is large enough to fit over the top and sides of the cake, measuring top and sides. Slide both hands under the fondant, carefully center it on top of a cake that has been iced with buttercream and refrigerated (The buttercream makes the fondant adhere to the cake.) You may apply Ganache to coat cakes prior to applying rolled fondant, this taste very good and allows a firm surface for the rolled fondant to be applied too.

Dust your hands with cornstarch and smooth the fondant, starting at the top and working down the sides until the entire surface is even and flat. (Being very careful not to stretch or crease, this will cause elephant skin effect in your finished fondant, if this should happen, peel fondant off your cake; re-knead re-roll and repeat the process) Cut off the excess icing around the bottom of the cake with a pizza cutter or sharp knife; work fondant with hands or fondant smoothers, to give a smooth finish.  Finish fondant cakes by adding embellishments with fondant draping, lace and complete by decorating with royal icing or buttercream.

Storage of Fondant Cakes

Many Professional decorators feel a fondant covered cake will hold the moisture in the cake for 3 to 5 days, depending on your atmosphere.  I personally don’t want to go beyond 3 days.  I prefer the cake to have a fresh taste. (I refrigerate my cakes, if they have perishable type fillings and no royal icing design work) Condensation can develop; this could change the base color of the fondant.  If using a colored icing to decorate, this could cause bleeding or dripping on sides of fondant if placed in refrigerator.
For show cakes, do not refrigerate your covered cake!  When you take the cake out of the refrigerator, moisture will condense and destroy your beautiful surface. Your best option is to store the cake in a sealed bakery box. The cardboard sides of a box will keep the dust in the air off the cake, but allows the Fondant to breath.

Rolled Fondant cakes were traditionally done on heavy type cakes, such as fruit cakes in Europe.  In Europe the cake was traditionally covered with Marzipan, then a layer of rolled fondant, this sealed the cakes freshness for several weeks without refrigeration. 

Thursday, 12 February 2015

HOW TO MAKE A MARSHMALLOW FONDANT

0 comments
Ingredients

1 package (16 ounces) white mini marshmallows (use a good quality brand)
2-5 tablespoons water
2 pounds (about 8 cups) sifted confectioners' sugar
1/2 cup solid vegetable shortening

Instructions:

step 1


To make marshmallow fondant, place marshmallows and 2 tablespoons of water in a microwave-safe bowl. Microwave 30 seconds on high; stir until mixed well. Continue microwaving 30 seconds more; stir again. Continue until melted (about 2 1/2 minutes).

step 2

Place 3/4 of the confectioners' sugar on top of the melted marshmallow mixture. Fold sugar into marshmallow mixture. Flavoring can be added at this point if desired. Place solid vegetable shortening in easily accessed bowl so you can reach into it with fingers as you are working. Grease hands and counter GENEROUSLY; turn marshmallow mixture onto counter. Start kneading like you would dough. Continue kneading, adding additional confectioners' sugar and re-greasing hands and counter so the fondant doesn't stick. If the marshmallow fondant is tearing easily, it is too dry; add water (about 1/2 tablespoon at a time) kneading until fondant forms a firm, smooth elastic ball that will stretch without tearing, about 8 minutes.

step 3

It's best to allow Marshmallow Fondant to sit, double-wrapped, overnight. Prepare the fondant for storing by coating with a thin layer of solid vegetable shortening, wrap in plastic wrap and then place in resealable bag. Squeeze out as much air as possible. Marshmallow Fondant will keep well in refrigerator for several weeks.

step 4

When not working with fondant, make sure to keep it covered with plastic wrap or in a bag to prevent it from drying out. When ready to use, knead fondant until smooth. Roll out fondant 1/8 in. thick.

step 5

To color fondant: If you need to tint the entire batch of fondant, add a little icing color to the melted marshmallow mixture before adding confectioners' sugar. For smaller amounts of tinted fondant, add icing color to portions of fondant as needed.

My finish product, a set of fondant cupcake toppers in bow and necktie design.


Showing posts with label Fondant. Show all posts

How to make embossed teddy bear fondant cupcake toppers


I loved making the fondant. So I came up with these sweet teddy bear cupcake toppers. I have made them in pink and blue and they are just perfect for a baby shower.

This is what I use:
Rolled fondant icing
Tylo powder
Rolling pin
Tylo glue
Small brush
Gel paste colors
Small blossom cutter with ejector (PME)
Teddy bear embosser from the Cradle 3D set (PatchWork Cutters)
Round cookie cutter (40mm)
Round scallop cookie cutter 2 1/4″ (58mm)
Round Piping tip no 2
Round piping tip with a 10mm opening
A little cornstarch for dusting and a small knife (not showing) if you want to make the tiny leaves on the girl cupcake toppers

Start adding some tylo powder to your white base. This will help the cupcake toppers to hold the shape better when they are placed in the frosting.

Step 1:
Roll out the white fondant to a 3 mm thickness and cut out circles with the scallop cookie cutter. Place them on a lightly cornstarch dusted tray as you go.
Step 2:
Take the round piping tip and “cut out” a small hole in each of the scallops.

Step 3:
Use another color of rolled fondant for the center of the cupcake toppers and roll out the fondant to a 2mm thickness. Cut out circles with the 40mm cookie cutter.

Step 4:
Use the large teddy bear embosser from the Patchwork cutter Cradle set and emboss the “center circle”.

Step 5:
Next brush a little tylo glue on the back of the embossed circle and place it in the middle of the white base.

Step 6:
If you like, you can glue on a couple of small blossoms and tiny leaves for the girl cupcake toppers.

TIP! I make the leaves out of tiny pieces of rolled fondant. Roll them into a small tear drop shape and make a little vein with a small knife.

Step 7:
For the boys, I have made a small ball. Roll out your fondant thinly. Use the round piping tip with the 10mm opening and cut out some dots. Use the end of the no 2 piping tip and emboss the middle of the ball.

Step 8:
Attache the small ball with a little brush of tylo glue.

Let the cupcake toppers dry thoroughly before use.

Happy Caking!

How To Make Tiny Flower Pot Cakes


Sometimes you want to create a dessert that is both a show stopper and is deceptively easy. Well, these teeny weeny flower pot cake bites are just the thing.

Using a chocolate mold makes them fool proof and dirt “brownie” filling tricks the eye but couldn’t be simpler. Use pre made royal icing flowers for the topper or pipe your own if you’re feeling ambitious. Either way, it’s the perfect treat to wow your guests.

Here’s what you’ll need:

Flower Pot Chocolate Mold
Orange Candy Coating Discs
Paintbrush
Store Bought Brownies (with no icing) or Chocolate Cake Pop Filling
Chocolate Store Bought Icing in a Piping Bag
Ready-to-Use Royal Icing Flowers or Fondant Flowers

Paint And Fill The Pots

Start by crumbling up the brownies and set them aside in a bowl.


Then, in a microwave safe bowl, heat some orange candy coating discs on half power. Remove after 30 seconds and stir. Continue to heat and stir in 30 second intervals until the discs are melted. (Be careful to not overheat the discs because they will burn).


Use a paintbrush to coat each cavity of the flower pot mold. Use a dabbing motion if paint strokes are leaving too many thin spots. (Reheat the coating as necessary because it may get firm if you are working slowly).

Place the mold in the fridge for 5 minutes. Remove it from the fridge, hold it up to the light and then touch up any thin spots with additional coating so that you have a solid shell to put filling in.


On the back of your royal icing flower, pipe a dollop of icing and then adhere the flower to the top of the cake. Accent with leaves or additional flowers.


And there you have it! Cutie and Yummy... Happy Caking!


Source: thecakegirls

How to make a simple ribbon rose fondant

Here’s what you’ll need… and the list is short today :) :

Work Mat
Shortening (to prevent sticking)
Fondant (I’m using pink)
Small rolling pin
Ribbon cutter
Scalpal or Xacto blade
Once you have all of your tools and materials gathered, you can get started immediately!
Step 1: Start by rubbing down your work surface with a thin layer of shortening to prevent sticking. Once it’s ready, roll out your fondant into a long rope or snake.  The length and diameter of your rope will depend on how large of a rose you want to make.


For the roses that I’m making in this tutorial (to go on a cupcake), the rope is about 10 inches long and less than an inch in diameter.

Step 2: Using your small rolling pin to flatten the rope.  I like to make mine no more than 1/8th of an inch thick.


Step 3: Once you have it rolled out evenly, set your ribbon cutter to the width of the ribbon you’d like to cut and simply roll over it to cut the ribbon!  You could also do this with a ruler and pastry cutter, but I use my ribbon cutter almost every week for cake projects and I highly recommend having one!


For these flowers, I had the ribbon width set to about 1 inch.  For smaller flowers, you could make the ribbons narrower.  Once the ribbon is cut, use the scalpel to cut the ends off even/straight (not pictured).

Step 4: Start at one one of the fondant ribbon and begin rolling it up.  I like to keep them tight in the center.

Step 5: After making a few loops, I begin to loosen it up at the top by pinching it on the bottom – this causes the top of the ribbons to flair out a bit.

Step 6: Keep rolling and pinching until you have the size flower that you want.   I wanted flowers to cover the top of my cupcake, so I made them a little larger:

There you have it, nice and easy. Feel free to share your project and I'll be glad to check them out. Happy Baking!

PHOTO CREDIT: CakeJournal

ROLLED FONDANT

The History of Rolled Fondant

So where did rolled fondant come from? I have been searching for the origin of rolled fondant for weeks now…  It had come up in conversation with a fellow decorator.  My initial guess was that maybe it was somehow related to fruit cake or marzipan.

I was delighted when my copy of  “Professional Cake Decorating” by Toba Garrett arrived in the mail, and it described, with the most detail so far, the invention of rolled fondant.  Not only does her book describe the development of icing, but also goes into detail about the development of the cake, as well as the development of piping and decorating.

This is the excerpt from her book “Professional Cake Decorating”, by Toba Garrett:

“From the seventeenth to the nineteenth centuries, the term icing usually meant that the cake was marzipan.  Marzipan was chiefly a celebration food, considered both a substance and a delicious confection.  As a substance, it was paired with sugar paste (also known as rolled fondant), and it could be shaped, sculpted, or molded into beautiful centerpieces.  It could be rolled, cut, stamped out, or dried, and candied fruits or spices could be added to it.  It could also be iced with glaze and dried in a warm oven before further garnishing.  Icing continued to evolve until the mid- to late nineteenth century, when royal icing was accepted and the art of piping began.

The early stages of sugar paste (rolled fondant) developed as early as 1558.  The recipe included rosewater, sugar, lemon juice, egg white, and gum tragacanth, them called gum dragon.  This vegetable compound is still used in commercial rolled fondant today.”

Fondant Icing

There are different types of fondant icing, only rolled fondant icing is covered in this guide.  Rolled fondant icing is also known as sugar paste.  The softer, more molded look of fondant icing is often used for birthday and novelty cakes.  Fondant icing is popular with professional and home cake decorators due to its ease of use, it can be applied in one layer and rolled fondant can be bought ready made.  Knead well until smooth and pliable, roll to the required shape and thickness.  It can be frozen, but must be allowed to defrost naturally.  The icing can be flavored using the essences and/or colored using the liquid, paste or powder dusting colors.  To add the coloring use a cocktail stick, adding a little at a time to achieve the desired shade.  Too much coloring or flavoring will make the paste sticky.  Powder colors seem to fade less.

The icing can be easily molded into flowers, animals and other shapes – once molded it will dry and retain its shape.  However, after a period of time the shapes can soften as the glycerin content attracts moisture so it should only be used on decorations that are to be consumed quickly.
Glycerine maybe added to rolled fondant if it is too dry or seems like an elephant skin texture.  If glycerine doesn't work, then try a little shortening.  You have to play with fondant texture, depending on the climate and weather. 

Rolled Fondant Icing Chart  This is just a guideline – not a set rule. You must work more fondant than you actually need on the cake to allow enough to hang free to work with for smoothing. The icing on the sides of the layers should be smoothed and gently stretched where necessary to conform to the shape of each individual cake. There should be no folds or creases in the fondant unless that particular effect is desired.

Beginning with the largest cake first and finishing with the smallest cakes allows you to rework the left over trimmings from each cake on the next tier (be sure and remove any crumbs before kneading with other fondant. Buttercream icing will knead into the fondant without any problem. 


Applying Fondant to Cake

Most fondant covered cakes are first covered with a layer of marzipan, this allows for a very smooth, straight edged cake.  Today most decorators will use buttercream which will sag as a cake sits. I prefer using whipped ganache in which gives a wonderful flavor when cutting the cakes. 
To cover a cake with fondant: Dust a clean pastry cloth, or a smooth, clean surface, with mixture of 50% cornstarch and 50% confectioners’ sugar;  roll the fondant with a rolling pin until it is approximately 1/8 to 1/4 inch thick, depends on brand types of fondant using. Make sure the fondant is large enough to fit over the top and sides of the cake, measuring top and sides. Slide both hands under the fondant, carefully center it on top of a cake that has been iced with buttercream and refrigerated (The buttercream makes the fondant adhere to the cake.) You may apply Ganache to coat cakes prior to applying rolled fondant, this taste very good and allows a firm surface for the rolled fondant to be applied too.

Dust your hands with cornstarch and smooth the fondant, starting at the top and working down the sides until the entire surface is even and flat. (Being very careful not to stretch or crease, this will cause elephant skin effect in your finished fondant, if this should happen, peel fondant off your cake; re-knead re-roll and repeat the process) Cut off the excess icing around the bottom of the cake with a pizza cutter or sharp knife; work fondant with hands or fondant smoothers, to give a smooth finish.  Finish fondant cakes by adding embellishments with fondant draping, lace and complete by decorating with royal icing or buttercream.

Storage of Fondant Cakes

Many Professional decorators feel a fondant covered cake will hold the moisture in the cake for 3 to 5 days, depending on your atmosphere.  I personally don’t want to go beyond 3 days.  I prefer the cake to have a fresh taste. (I refrigerate my cakes, if they have perishable type fillings and no royal icing design work) Condensation can develop; this could change the base color of the fondant.  If using a colored icing to decorate, this could cause bleeding or dripping on sides of fondant if placed in refrigerator.
For show cakes, do not refrigerate your covered cake!  When you take the cake out of the refrigerator, moisture will condense and destroy your beautiful surface. Your best option is to store the cake in a sealed bakery box. The cardboard sides of a box will keep the dust in the air off the cake, but allows the Fondant to breath.

Rolled Fondant cakes were traditionally done on heavy type cakes, such as fruit cakes in Europe.  In Europe the cake was traditionally covered with Marzipan, then a layer of rolled fondant, this sealed the cakes freshness for several weeks without refrigeration. 

HOW TO MAKE A MARSHMALLOW FONDANT

Ingredients

1 package (16 ounces) white mini marshmallows (use a good quality brand)
2-5 tablespoons water
2 pounds (about 8 cups) sifted confectioners' sugar
1/2 cup solid vegetable shortening

Instructions:

step 1


To make marshmallow fondant, place marshmallows and 2 tablespoons of water in a microwave-safe bowl. Microwave 30 seconds on high; stir until mixed well. Continue microwaving 30 seconds more; stir again. Continue until melted (about 2 1/2 minutes).

step 2

Place 3/4 of the confectioners' sugar on top of the melted marshmallow mixture. Fold sugar into marshmallow mixture. Flavoring can be added at this point if desired. Place solid vegetable shortening in easily accessed bowl so you can reach into it with fingers as you are working. Grease hands and counter GENEROUSLY; turn marshmallow mixture onto counter. Start kneading like you would dough. Continue kneading, adding additional confectioners' sugar and re-greasing hands and counter so the fondant doesn't stick. If the marshmallow fondant is tearing easily, it is too dry; add water (about 1/2 tablespoon at a time) kneading until fondant forms a firm, smooth elastic ball that will stretch without tearing, about 8 minutes.

step 3

It's best to allow Marshmallow Fondant to sit, double-wrapped, overnight. Prepare the fondant for storing by coating with a thin layer of solid vegetable shortening, wrap in plastic wrap and then place in resealable bag. Squeeze out as much air as possible. Marshmallow Fondant will keep well in refrigerator for several weeks.

step 4

When not working with fondant, make sure to keep it covered with plastic wrap or in a bag to prevent it from drying out. When ready to use, knead fondant until smooth. Roll out fondant 1/8 in. thick.

step 5

To color fondant: If you need to tint the entire batch of fondant, add a little icing color to the melted marshmallow mixture before adding confectioners' sugar. For smaller amounts of tinted fondant, add icing color to portions of fondant as needed.

My finish product, a set of fondant cupcake toppers in bow and necktie design.


Ryken Chocolates Copyright 2009 Sweet Cupcake Designed by Ipiet Templates Image by Tadpole's Notez