Tuesday, 17 November 2015

My First Barbie Doll Cake

0 comments

I made this cake for my son's schoolmate. The base cake is chocolate with buttercream icing in yellow and blue combination. Assembling the cake was not that difficult as long as you have the tools, decorations will come smoothly along the way! I used an Ateco open star tip to pipe the rosette to cover the cake and a small star tip for the bodice. So without further ado
I braided her hair so it won't fall on the cake :)
Delivering the cake is more difficult than putting it all together. After smothering a mother load of icing it was quite heavy for the lifting. But who cares, the cake was cute and all the kids at the party adored it... they can't take their eyes off it and kept telling their moms that they too wanted the same cake on their party. Overall it's was such an adorable creation and I'm looking forward to make more in the future. 
I boxed the cake using my standard cake boxes, made a sort of a peep window using a cling wrap for easy viewing ;)
Finally the cake comes with cute belgian chocolate cupcakes. Piped with swirls and roses using basic star and rose tip.
And for the finishing touches, added some cupcake toppers to complete the barbie theme!

Happy baking...!


0 comments
Salted Caramel Brownies

Yield: 12 SERVINGS 
Prep time: 20 MINUTES 
Cook time: 30 MINUTES

Ingredients:

4 ounces unsweetened chocolate; coarsely chopped
3/4 cup unsalted butter, cut into cubes
1 cup sugar
3 large eggs
1 teaspoon pure vanilla extract
1/2 teaspoon salt
1 cup all-purpose flour
9 Ghirardelli Dark Chocolate and Sea Salt Caramel Squares
1/2 cup Planters Salted Caramel Peanuts, chopped

Directions:

1. Preheat oven to 350 degrees. Line an 8×8 inch baking pan with foil and spray with nonstick cooking spray.

2. Microwave chocolate and butter in a large bowl microwave-safe bowl at medium (50% power) for 2-3 minutes or until butter is melted.

3. Stir until chocolate is melted. Whisk in sugar, eggs, vanilla and salt. Gradually add in flour; stir until just combined.

4. Spread 1/2 the batter into prepared pan. Add an even layer of Ghirardelli Dark Chocolate and Sea Salt Caramel Squares, sprinkle the peanuts over the batter and chocolate, and cover with remaining 1/2 of brownie batter.

5. Bake for 30-35 minutes; do not over bake.

6. Allow to cool thoroughly and cut into large squares.

Notes:
Salted Caramel Brownies are best served the day they are made; however, they will keep at room temperature in an airtight container for up to 3 days.

Source: Baking Addictions

Sunday, 26 July 2015

ONE BOWL CHOCOLATE CAKE

0 comments

INGREDIENTS

Unsalted butter, softened, for pans
3/4 cup unsweetened Dutch cocoa powder, plus more for pans
1 1/2 cups all-purpose flour
1 1/2 cups sugar
1 1/2 teaspoons baking soda
3/4 teaspoon baking powder
3/4 teaspoon salt
2 large eggs
3/4 cup low-fat buttermilk
3/4 cup warm water
3 tablespoons safflower oil
1 teaspoon pure vanilla extract

DIRECTIONS

  1. Preheat oven to 350 degrees. Butter two 8-inch round cake pans (2 inches deep); dust with cocoa. Sift cocoa, flour, sugar, baking soda, baking powder, and salt into the bowl of a mixer. Beat on low speed until just combined. Raise speed to medium, and add eggs, buttermilk, water, oil, and vanilla. Beat until smooth, about 3 minutes.
  2. Divide batter between pans. Bake until set and a toothpick inserted into the centers comes out clean, about 35 minutes. Let cool for 15 minutes. Turn out from pans. Transfer, faceup, to wire racks. Let cool completely.
  3. Spread 2 cups chocolate frosting onto top of 1 cooled layer. Top with remaining layer; frost top and sides with remaining 2 cups frosting.

CHOCOLATE FROSTING

INGREDIENTS

2 1/4 cups confectioners' sugar
1/4 cup unsweetened cocoa powder
Pinch of salt
6 ounces cream cheese, room temperature
1 1/2 sticks unsalted butter, softened
9 ounces bittersweet chocolate, melted and cooled slightly
3/4 cup creme fraiche, or sour cream

DIRECTIONS

  • Sift together sugar, cocoa, and salt.
  • Beat cream cheese and butter with a mixer on medium-high speed until smooth. 
  • Reduce speed to medium-low; gradually add sugar-cocoa mixture, and beat until combined. Pour in chocolate in a slow, steady stream. Add creme fraiche; beat until combined.
Source: Martha Bakes

How to make a perfect SORBET

0 comments
Source: Martha Bakes

Monday, 8 June 2015

HOW TO MAKE YOUR OWN "NUTELLA"

0 comments


Ingredients

1 Cup of hazelnuts
1/4-1/8th of a cup of oil
1 Cup of caster sugar or white sugar
1/4 Cup of cocoa


Source: YouTube

How To Make MILK CHOCOLATE

0 comments


Ingredients: 

50g cocoa butter
50g icing
3 TBL cocoa powder -- 18grams
2 TBL powder milk. --- 13grans
A pinch of salt

Source: YouTube

Thursday, 4 June 2015

See Some of the most Outrageous Wedding Cakes Ever!

0 comments

While many have probably dreamed of their wedding cakes since childhood, they were most likely not wedding cakes quite like this. From a cake with a river running through it to a tower of cake dripping in 30 pounds of Swarovski crystals, Food Network is going from coast to coast to find the most incredible creations by the best cake artists in the country. These magicians can make anyone’s dream cake come true —— no matter the cost.

Souce: YouTube

6 Basic Piping Techniques

0 comments
Learn how to pipe a cake with frosting from professional pastry chef Katie Rosenhouse in this Howcast cake decorating video.


And there are a few different basic techniques for piping. You can either start with a very French thing we do in my culinary school would be rosettes. So a very simple things is just to kind of push down and twist around and you have a beautiful little rosette. And you could do those kind of all around your cake as a cute little border. Just a few every now and again. Put some sprinkles. If you have your little round this is great. And by the way you can see that I'm not overfilling my bags. The longer you hold the bag with your hand that heat from you will start to melt to frosting, so just as little as you can get by with. And keep refilling as you go will keep your frosting nice and stiff. 

But all I want to do with this is if I was creating a border I would push and pull towards me you can see that that makes sort of a tear drop kind of a shape. And then go back in and push and pull towards me and same thing over and over again. And try to keep the pressure nice and even. It's like little beads. Making a little necklace and that's perfect as a border. You can go all around your cake. We'll actually get more into that in another video. 

But with this lovely thing, you could do... Let's see how this comes out. I mean with all of these you could kind of play around and do anything you like. But if you want to do like little swoops, very fun. Kind of all-around just big swoopy motions. And then my favorite is the star tip what these are called are shells. I never get to put frosting on the table. This is like every fantasy come true. Again you could kind of push and pull towards you make little shells. Or this is great for little rosettes or a hundred other things really. 

Always just have fun with it. If you wanted to do a little lace I could go back to my circle tip this is great also for little dots kind of all over. Or if I wanted to do a big squiggly, it's going to look crazy but once it's all over your cake, imagine how kind of cool that could look like all around the edge like very avante garde. We can get very whatever we want to do. But remember whatever you're doing whatever you're piping it's just frosting in a bag. So as long as your pushing in a nice even motion and getting a nice clean design in the way that you want it you'll always be a success.


Source: YouTube

Monday, 1 June 2015

How Much Do You Know About FLOUR

0 comments
TRIVIA TIME

Flour Composition

•Ash content

-Bread Flour and All Purpose flour has 0.5% – 0.6% ash content.
-Soft Flour and Cake Flour has less than (<0.5%) ash content.

•Moisture content

- If the moisture content of flour is elevated, the flour will have a shorter shelf life and lower yield. Flour has been considered adulterated with water, under the federal standards of the United States, if the moisture content exceeded 13.5%. Recently this standard has been changed to 15 %.

•Gluten content

- Gliadin – when hydrated is viscous and can be stretched to a thin strand or     made to flow easily with gravity.
- Glutenin – when hydrates is very elastic.

•Starch content

- Starch make up about 62-73% of flour which is made entirely by Glucose a common six carbon sugar (C6H12O6).
- Starch is made up of two different molecules of glucose.
- Amylose, an essentially linear molecule. Common wheat starch is about 25% amylose.
- Amylopectin, which is distinguished from amylose in two ways. It is a highly branched and much larger. Composes 75% of starch. 

•Flour Enzymes
- Amylase, enzymes that catalyze the hydrolysis of the bonds between glucose units in amylose and amylopectin.
- α-amylase reduces starch to a series of branched and linear fragments called dextrins.
- β-Amylase reduces amylase primarily to maltose, a two glucose unit.

•Flour Additives
- Enrichments
- Oxidants, compounds added to strengthens the dough making it more elastic and enhancing its gas holding capacity (e.g. azodicarbonamide, calcium peroxide, and ascorbic acid.)

- Reducing Agents, compounds added to flour to reduce mixing time significantly and make dough easier to handle and process.


Source: Sonlie International

How to Start a Career in Cake Decorating & Pastry Arts

0 comments
Careers in cake decorating and pastry arts require little to no formal education. Learn about the training, job duties and optional certification for bakers to see if this is the right career for you.

Essential Information

Individuals who enjoy baking and decorating cakes and pastries may find careers as cake decorators rewarding and fun. Cake decorators are specialized bakers. Culinary programs for aspiring cake decorators teach students how to blend colors and create shapes and figures. Aside from attending a culinary or technical school, bakers can be trained through apprenticeships and on-the-job training. Some certifications are also available in this field.
Step 1: Consider a Cake Decorating and Pastry Arts Career

Cake decorating is a hands-on industry. Possible positions for those interested in cake decorating and pastry arts may include pastry artisan, bakery owner, cake designer and caterer. A culinary degree in cake decorating provides students with the skills needed to open their own bakery or cake decorating shop, with apprenticeships available to help them obtain the knowledge they need to get started.

Step 2: Decide on a Training Program

Individuals interested in learning the art of cake decorating and creating pastry have several academic options, from courses and diploma programs to certificate and degree programs. Diploma and certificate programs often take one year to complete, while associate's degree programs usually require two years of theoretical study and practice. Students develop culinary skills that qualify them for employment at bakeries and specialty shops, as well as working on their own.

Step 3: Take Courses

In addition to cake decorating and pastry arts courses, participants learn about safety, sanitation, nutrition and business. While students take courses, a majority of the program entails hands-on learning where they actually bake and decorate their creations. Additionally, they take part in seminars or internships at approved businesses. Some of the creations they make include sugar and chocolate confections, miniature cakes, specialty desserts, artisan breads, icings and decorative frosting.

Step 4: Earn Certification

Although certification is not a requirement to work in cake decorating and pastry arts, it's a way graduates can demonstrate their education, experience and credentials to potential employers or customers. Various certifications are offered through the Retail Bakers of America and the American Culinary Federation. Examples of certifications include Certified Pastry Culinarian, Certified Working Pastry Chef, Certified Journey Baker, Certified Decorator and Certified Baker.

Step 5: Find Employment

In addition to learning to decorate cakes, graduates of culinary arts programs are qualified for entry-level positions in many food industries. According to the U.S. Bureau of Labor Statistics in May 2013, the median salary for bakers, including cake decorators, was $23,160 per year, with the bottom ten percent earning less than $18,000 and the top-paid ten percent bringing in over $37,000. Salaries vary somewhat by position and location.


Source: study.com

Friday, 29 May 2015

Basic French Macarons

0 comments

NOTES

The basic meringue-style French macaron is merely the springboard for your wildest color and flavor combinations. Try adding a teaspoon of Dutch-process cocoa and red gel food coloring for a red velvet macaron, or a 1/4 teaspoon rose extract and pink gel food coloring for rose. Always add the dry flavorings to the almond meal/powdered sugar mixture and the extracts/gel color to the meringue.

INGREDIENTS

2/3 cup almond meal or ground almonds
1 1/2 cups powdered sugar
3 large egg whites, room temperature and preferably aged up to 3 days
5 tablespoons granulated sugar
1 teaspoon vanilla extract

DIRECTIONS
  1. Preheat the oven to 280ºF, and position 2 racks in the lower section of the oven. Line 2 rimmed baking sheets with parchment paper. If you have time, draw 1-inch circles on the back of each sheet, spacing the circles at least 1/2-inch apart.
  2. If your almond meal is very coarse, grind it with the powdered sugar in a food processor until fine. Sift the almond meal-powdered sugar mixture twice through a mesh sieve.
  3. Place egg whites in the bowl of a stand mixer (or use a hand mixer), and begin to beat on medium-high. When the eggs are frothy, gradually add granulated sugar 1 tablespoon at a time until fully incorporated. Continue to beat the egg white mixture until glossy and stiff peaks form when you lift the beaters. Gently stir in the vanilla extract. Be careful to not overbeat the meringue (e.g., the meringue takes on a clumpy texture).
  4. Add half of the sifted almond mixture, and gently fold it into the meringue using a flexible silicone spatula. Lift from the bottom, up around the sides, and toward the middle, being careful to not over-agitate the meringue and lose too much air. Once the almond mixture is predominantly incorporated, add the second half and repeat the folding motion.
  5. When the almond mixture is just incorporated, you will need to transform the batter into the appropriate texture. Using the flat of the spatula, "punch" down into the center of the batter, then scrape more batter from the sides to the center, and punch again. You will need to repeat this 10-15 times (or more, depending on your arm strength and the beginning texture of your batter) until the batter slowly and continuously drips back into the bowl when you scoop it up with the spatula. Think of the consistency of molten lava. For the best results, punch the batter a few times, check the consistency, then punch a few more times, etc. Do not make the batter too runny or the macarons won't rise as they should, and you could end up with oil stains on the surface.
  6. Pour batter into a pastry bag fitted with a 0.4-inch tip. In a pinch, you can also use a gallon-size Ziploc bag: just snip a teeny bit from one of the bottom corners. Twist and clip the top of the bag to avoid overflow. On your prepared baking sheets, pipe out 1-inch rounds in the circles you drew (remember to draw the circles on the back side of your parchment to avoid ink or pencil stains on your macarons!).
  7. Holding the baking sheet in both hands, rap each baking sheet firmly on the counter two or three times. This smooths out the tops and helps form the "pied" or frilly foot on the bottoms of the macarons. Allow the piped macarons to dry, uncovered, for at least 15 minutes. The macarons should form a very thin, smooth crust where, if you tap it lightly with your finger, the batter will not stick to your finger. If after 15 minutes, the batter is still sticky, let it dry longer. This may take up to an hour on humid days.
  8. Place both baking sheets in the oven and bake for 15-18 minutes. After the first 2 minutes, open the oven to allow any excess humidity to escape. Halfway through, swap oven racks and rotate the sheets for even baking. The macarons are done when they are baked all the way through and the shells are just hard. Take care to not underbake (insides will still be mushy) or overbake (tops will begin to brown). Remove them from the oven, and cool on baking sheet placed on a wire rack.
  9. When fully cooled, assemble the macarons with your choice of filling. The assembled macarons can be stored in an airtight container in the refrigerator for up to one week.

Source: Popsugar.com

Thursday, 21 May 2015

No-Bake Chocolate and Peanut Butter Oatmeal Bars

0 comments

INGREDIENTS

Vegetable oil cooking spray
9 ounces chocolate wafers (about 40 wafers), finely ground (2 cups)
1 1/2 cups old-fashioned oats
1 1/4 cups confectioners' sugar
1/4 teaspoon coarse salt
5 ounces (1 stick plus 2 tablespoons) unsalted butter, cut into small pieces
1 cup chunky peanut butter
3/4 cup plus 3 tablespoons smooth peanut butter
10 ounces semisweet chocolate, melted
1 1/2 ounces milk chocolate, melted

DIRECTIONS

  1. Coat a 9-by-13-inch baking dish with cooking spray. Line with parchment, leaving a 2-inch overhang on the 2 long sides.
  2. Combine wafers, oats, sugar, and salt in a large bowl. Melt butter in a medium saucepan over medium heat, then add chunky peanut butter and 3/4 cup smooth peanut butter, whisking until well combined. Add peanut butter mixture to wafer mixture, stirring until combined. Transfer to baking dish, and use the bottom of a measuring cup or an offset spatula to firmly press mixture into an even layer. Refrigerate for 30 minutes.
  3. Pour melted semisweet chocolate over chilled mixture and, using an offset spatula, spread into a thin layer that covers the entire surface. Refrigerate until hardened, at least 15 minutes.
  4. Heat remaining 3 tablespoons smooth peanut butter in a small saucepan until runny. Drizzle peanut butter over chilled chocolate. Drizzle melted milk chocolate over peanut butter. Refrigerate until hardened, about 15 minutes.
  5. Use parchment to lift out chilled block of bars. Run a sharp knife under hot water, dry well, and cut into 24 squares, wiping knife between cuts. Let bars stand at room temperature for 10 minutes before serving. (Sliced bars can be refrigerated for up to 1 week or frozen for up to 1 month.)

Source: Martha Bakes

Tuesday, 12 May 2015

How to Make Sugared Flowers

0 comments
Source: Martha Bakes

How to make a Ganache

0 comments
Source: Martha Bakes

How to Form a Jelly Roll

0 comments

Source: Martha Bakes

Black Forest Cheesecake

0 comments

Impress guests with a new take on the Black Forest Cake.

Makes 1 (9-inch) cake 
Prep Time 20 to 30 minutes, plus chilling time 
Baking Time 1 1/2 hours, plus resting time


For the Crust:

24 chocolate sandwich cookies (filling included; we used Oreo cookies)
1 tablespoon sugar
1/4 cup unsalted butter, melted

For the Chocolate Cheesecake Filling:

280 grams good-quality bittersweet chocolate, chopped finely
4 (8-ounce) packs cream cheese, at room temperature
1 cup plus 6 tablespoons sugar
5 medium eggs

For the Whipped Cream Cheese Icing:
1/3 cup cream cheese, softened
3 tablespoons sugar
1 teaspoon vanilla extract
1 cup whipping cream 
1/2 (595-gram) can cherry topping


  1. Preheat oven to 325°F. Grease a 9-inch springform pan with butter; set aside.
  2. Make the crust: Crush cookies until fi ne in a food processor. (You can also place the cookies in a zip-top bag and crush them with a rolling pin.) Combine crushed cookies, sugar, and butter in a bowl. Stir until well combined. Press onto the bottom of the prepared springform pan. Bake for 10 minutes; set aside and let cool.
  3. Make the filling: Place chocolate in a heatproof bowl. Place bowl over a pot of simmering water, making sure the water does not touch the bottom of the bowl. Melt chocolate completely, stirring occasionally. Let cool slightly.In the bowl of an electric mixer fitted with the paddle attachment, cream together cream cheese and sugar until light. Add eggs one at a time, beating well after each addition. Pour in melted chocolate; beat until combined.
  4. Pour filling into prepared crust; bake for 11/2 hours or until sides are cooked but center still jiggles when tapped. Remove cheesecake from the oven. Run a knife around the pan to loosen the edges.
  5. Return cheesecake to oven. Turn o¡ heat and leave the oven door ajar. Leave in the oven for 2 to 4 hours. Remove cheesecake from oven; chill for at least 4 hours before decorating.
  6. Un-mold cheesecake from pan and transfer to a plate or cake board; wrap with at least 3 layers of plastic wrap, then wrap completely with aluminum foil. Freeze for up to 1 month.
  7. Let cheesecake thaw overnight in the refrigerator.
  8. Make the whipped cream cheese icing: In the bowl of an electric mixer fitted with the paddle attachment, cream together cream cheese and sugar until light. Add vanilla and slowly pour in whipping cream. Continue beating until stiff peaks form.
  9. Spread cherry topping over cheesecake, leaving a 1/2-inch border along the edges. Pipe cream cheese icing on the border. Chill before serving. Refrigerate for up to 5 days in an airtight container.

Wednesday, 22 April 2015

How to make embossed teddy bear fondant cupcake toppers

0 comments


I loved making the fondant. So I came up with these sweet teddy bear cupcake toppers. I have made them in pink and blue and they are just perfect for a baby shower.

This is what I use:
Rolled fondant icing
Tylo powder
Rolling pin
Tylo glue
Small brush
Gel paste colors
Small blossom cutter with ejector (PME)
Teddy bear embosser from the Cradle 3D set (PatchWork Cutters)
Round cookie cutter (40mm)
Round scallop cookie cutter 2 1/4″ (58mm)
Round Piping tip no 2
Round piping tip with a 10mm opening
A little cornstarch for dusting and a small knife (not showing) if you want to make the tiny leaves on the girl cupcake toppers

Start adding some tylo powder to your white base. This will help the cupcake toppers to hold the shape better when they are placed in the frosting.

Step 1:
Roll out the white fondant to a 3 mm thickness and cut out circles with the scallop cookie cutter. Place them on a lightly cornstarch dusted tray as you go.
Step 2:
Take the round piping tip and “cut out” a small hole in each of the scallops.

Step 3:
Use another color of rolled fondant for the center of the cupcake toppers and roll out the fondant to a 2mm thickness. Cut out circles with the 40mm cookie cutter.

Step 4:
Use the large teddy bear embosser from the Patchwork cutter Cradle set and emboss the “center circle”.

Step 5:
Next brush a little tylo glue on the back of the embossed circle and place it in the middle of the white base.

Step 6:
If you like, you can glue on a couple of small blossoms and tiny leaves for the girl cupcake toppers.

TIP! I make the leaves out of tiny pieces of rolled fondant. Roll them into a small tear drop shape and make a little vein with a small knife.

Step 7:
For the boys, I have made a small ball. Roll out your fondant thinly. Use the round piping tip with the 10mm opening and cut out some dots. Use the end of the no 2 piping tip and emboss the middle of the ball.

Step 8:
Attache the small ball with a little brush of tylo glue.

Let the cupcake toppers dry thoroughly before use.

Happy Caking!

Tuesday, 21 April 2015

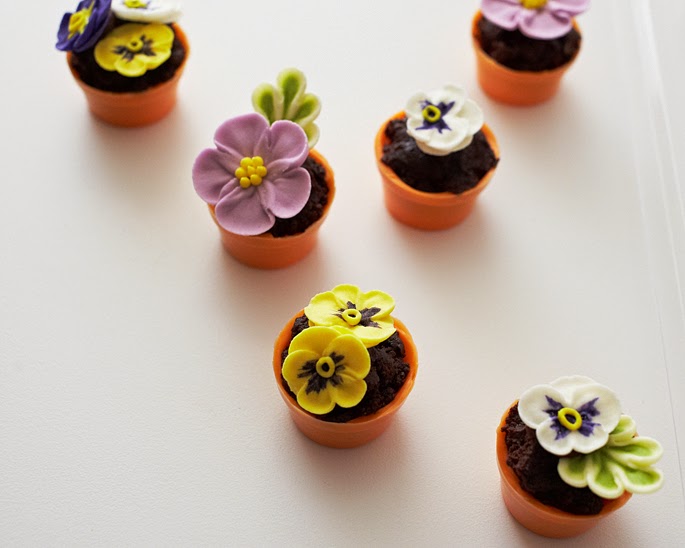
How To Make Tiny Flower Pot Cakes

0 comments

Sometimes you want to create a dessert that is both a show stopper and is deceptively easy. Well, these teeny weeny flower pot cake bites are just the thing.

Using a chocolate mold makes them fool proof and dirt “brownie” filling tricks the eye but couldn’t be simpler. Use pre made royal icing flowers for the topper or pipe your own if you’re feeling ambitious. Either way, it’s the perfect treat to wow your guests.

Here’s what you’ll need:

Flower Pot Chocolate Mold
Orange Candy Coating Discs
Paintbrush
Store Bought Brownies (with no icing) or Chocolate Cake Pop Filling
Chocolate Store Bought Icing in a Piping Bag
Ready-to-Use Royal Icing Flowers or Fondant Flowers

Paint And Fill The Pots

Start by crumbling up the brownies and set them aside in a bowl.


Then, in a microwave safe bowl, heat some orange candy coating discs on half power. Remove after 30 seconds and stir. Continue to heat and stir in 30 second intervals until the discs are melted. (Be careful to not overheat the discs because they will burn).


Use a paintbrush to coat each cavity of the flower pot mold. Use a dabbing motion if paint strokes are leaving too many thin spots. (Reheat the coating as necessary because it may get firm if you are working slowly).

Place the mold in the fridge for 5 minutes. Remove it from the fridge, hold it up to the light and then touch up any thin spots with additional coating so that you have a solid shell to put filling in.


On the back of your royal icing flower, pipe a dollop of icing and then adhere the flower to the top of the cake. Accent with leaves or additional flowers.


And there you have it! Cutie and Yummy... Happy Caking!


Source: thecakegirls

Sunday, 19 April 2015

How to Pipe Using a Round Tip

0 comments
There are endless possibilities when it comes to decorating a cake, this video tutorial will demonstrate various piping techniques using 1A or commonly called the round tip. Source: Martha Stewart

How to Crumb-Coat a Cake

0 comments
This simple video demonstrates how you can easily frost your cake. The first stage is called "crumb coat" wherein a thin layer of icing is spread on a cake.

Source: Martha Stewart

Chocolate Tablea Cupcakes

0 comments

The brown butter muscovado glaze adds the sweet notes to this decadent cupcake.

Makes 2 1/2 dozen cupcakes
Prep Time 20 minutes
Baking Time 20-22 minutes

¾ cup tablea chocolate,  finely ground
¼ cup cocoa powder, sifted
240 ml boiling water
¼ cup yogurt, at room temperature
¾ cup full cream milk, at room temperature
1 ¾ cup all-purpose flour 
1 ½ teaspoon baking soda
¼ teaspoon salt
½ cup butter, softened
1 ½ cup white sugar
3 tsp vanilla extract
3 large eggs, at room temperature
⅓ cup walnuts, toasted and chopped (optional)

For the brown butter muscovado glaze:
½ cup salted butter
1 cup muscovado sugar
3 tablespoons milk
2 cups powdered sugar, sifted


1. Make the cupcakes: Preheat oven to 350ºF. Line a muffin pan with cupcake liners. In a bowl, mix the tablea chocolate and cocoa powder together. Pour the hot water of the chocolate mixture, mix to combine. Refrigerate for 15 minutes or until it is at room temperature.

2. In a separate bowl, mix the yogurt and the milk together. Set aside.

3. In a medium sized bowl, sift the flour, baking soda, and salt together and mix well with a wire whisk. Set aside.

4. In a large mixing bowl, cream the butter, sugar, and vanilla on medium speed until light and fluffy. Add the eggs one by one, beating for 20 seconds after each addition or until just combined.

5. Slowly pour the chocolate mixture into the egg mixture while beating on medium speed until just combined. Do not overmix.

6. Add half of the flour mixture into the chocolate mixture and beat on low speed until combined. Add half of the milk mixture onto the chocolate mixture and beat on low speed until combined. Repeat with the rest of the ingredients. Do not overmix.

7. Pour the batter evenly into a prepared cupcake pan and bake for 20-22 minutes or until the cakes are firm to the touch. Let the cupcakes cool completely on a wire rack, about 1 hour.  

8. Make the glaze: In a medium-sized saucepan, melt the butter over low heat. Once it is melted, it will start bubbling and will start slowly browning. Let the butter brown for 4 to 5 minutes; watch it carefully because it can burn.

9. Once the butter is browned, add the muscovado sugar and constantly stir over low heat until the sugar is melted.

10. Add the milk and bring the mixture up to a boil, constantly stirring. Take it off the heat.

11. Let the mixture stand for 5 minutes, then gradually add the powdered sugar until it becomes a smooth spreadable glaze. Glaze the cupcakes as desired. If using, sprinkle toasted walnuts over the glaze immediately.  


Source: Yummy

Yema Chiffon Cake

0 comments

Glaze a chiffon cake with an all-time fave: yema frosting!

Makes 1 (6-inch) 2-layer square cake or 1 (6-inch) 2-layer round cake 
Prep Time 15 minutes
Baking Time 40-45 minutes


4  egg whites
¼ cup white sugar
¼ teaspoon cream of tartar
1 ¼ cups flour
1 teaspoon baking powder
½ teaspoon salt
¼ cup white sugar
4 egg yolks
⅓ cup full cream milk
1 teaspoonvanilla
¼ cup vegetable oil
Grated zest of 1 lemon


For the yema filling: 
14 oz condensed milk
3  eggs yolks
½ teaspoon salt
½ teaspoon vanilla
Grated cheese, for garnish (optional)

1.  Position a rack in the center of the oven and preheat at 350ºF. Line the bottom of a 6-inch square cake pan with parchment paper.

2.  To make the chiffon cake, place the egg whites and cream of tartar in a clean mixing bowl and beat for 2 minutes or until they reach soft peaks. Put mixer on medium speed: slowly add sugar and whip for another 2 minutes until the whites are glossy and still hold soft peaks.

3.  In a separate bowl, combine the flour, baking powder, salt, and sugar and mix well with a wire whisk.

4.  In a large mixing bowl, beat the egg yolks, milks, vanilla, oil, and lemon zest until they are combined. Add the flour mixture and beat on medium until everything is well incorporated. 

5.  Using a rubber spatula, gently fold about ⅓ of the whipped whites into the flour mixture to lighten up the batter. Then gently fold in the remaining egg whites. Do not overmix. 

6.  Spread the batter evenly in your prepared pan and bake for 40-45 minutes or until the top springs back when pressed lightly and the top of the cake doesn't stick to your fingertips. Let the cake rest for a minute in the pan before turning it out to cool on a wire rack. Gently peel off the parchment and let the cake cool to room temperature.

7.  Make the yema filling: combine the condensed milk, egg yolks, salt, and vanilla in a medium saucepan and cook over low heat for 10 minutes or until the mixture thickens into a smooth and spreadable filling. 

8.  Cut through the cake into two even layers. Spread filling onto the first layer of cake and place the second layer of cake on top. Spread the rest of the yema filling on top of the cake and over the sides. Let the cake set in the refrigerator for an hour before serving. If desired, sprinkle grated cheese of the top of the cake.  


Source: Yummy.ph

Saturday, 18 April 2015

Dark Chocolate Crinkles

0 comments

Ingredients:

¼ cup black cocoa powder plus ½ cup cocoa powder
¾ cups vegetable oil
2 cups sugar
4 large eggs
1 tablespoon vanilla extract
2 1/3 cups all-purpose flour
2 teaspoons baking soda
1 teaspoon salt
1 cup confectioner’s sugar

Instructions:

  1.  In the bowl of an electric mixer with a whisk attachment, combine cocoa, oil and sugar. Add eggs and vanilla and mix until well combined.
  2. In a separate bowl, combine all-purpose flour, baking soda, and salt.
  3. Gradually add to the cocoa mixture and stir until just combined.
  4. Place the mixture in the refrigerator for at least an hour or until the dough is firm before using.
  5. Preheat oven to 350°F.
  6. Shape the dough into ¾-inch balls and roll in the confectioner’s sugar to coat completely.
  7. Place the balls in a lightly greased cookie sheet or a cookie sheet lined with parchment paper. Arrange the balls about 2 inches apart.
  8.  Bake the cookies until puffed and cracked on the top, about 10-12 minutes.
  9. Cookies should look undone and still soft in the center. The internal heat will cook the cookies while cooling down and will keep them moist and chewy on the inside and crisp on the outside. Cool completely.

Tip

Black cocoa powder is a type of alkalized, Dutch-processed cocoa. It is available at specialty baking supply stores like SweetCraft and Chocolate Lovers. To make the usual chocolate crinkles, just use ¾ cup cocoa powder.

Brazo de Mercedes

0 comments

INGREDIENTS:

10 large eggs
1/2 tsp cream of tartar
1 tsp pure vanilla extract
3/4 c sugar
3 Tbsp confectioners’ sugar
14 oz sweetened condensed milk

INSTRUCTIONS:

  1. Separate the egg whites from the yolk.
  2. In a bowl, combine egg whites and cream of tartar. Beat using an electric mixer until soft peaks form.
  3. Make the meringue by gradually adding the granulated sugar while mixing the ingredients. Mix until the texture is semi-firm.
  4. Preheat the oven to 350º Fahrenheit.
  5. Place wax paper on top of a cookie sheet or large rectangular baking pan and grease the surface.
  6. Place the meringue on top of the greased wax paper then spread evenly using a spatula.
  7. Bake the meringue for 20 to 22 minutes or until the color of the top part turns light to medium brown.
  8. While the meringue is in the oven, make the filling by combining the egg yolks and condensed milk in a small cooking pot. Cook the mixture on the stove (low heat) while continuously stirring until the texture becomes thick.
  9. Add the vanilla extract to the condensed milk and egg yolk mixture, turn off the heat, and mix thoroughly. Set aside.
  10. Remove the meringue from the oven and cool down for a few minutes.
  11. Sprinkle the confectioners sugar on top of the meringue then place wax paper on the top part of the meringue, place a similar sized baking pan or tray on top. Note: The meringue should now be in the middle of two baking trays.
  12. Flip the trays. The tray you just placed on top should now be under. Remove the baking tray that is now on top and the wax paper (you should now see the opposite side of the baked meringue) then spread the filling (cooked egg yolks, condensed milk, and vanilla extract mixture) over the meringue.
  13. Roll the meringue starting at the longest side. Make sure that the filling is rolled inward and in the center of the roll.
  14. Transfer to a serving plate, slice then serve.


Source : Foodipino

Photo Credit: kawalingpinoy.com

Maltesers Cake

0 comments

INGREDIENTS:

 200g (1 cup, firmly packed) brown sugar
 185ml (¾ cup) milk
 125g butter, chopped
 115g (¾ cup) self-raising flour
 75g (½ cup) plain flour
 50g (½ cup) cocoa powder
 3 eggs, lightly whisked
 185g butter, extra, at room temperature
 345g (2 ¼ cups) icing sugar mixture
 95g (¾ cup) malted milk powder
 1 tablespoon milk, extra
 465g Maltesers

 Ganache
 300g dark cooking chocolate, finely chopped
 125ml (½ cup) thickened cream
 30g butter

DIRECTIONS:

1. Preheat oven to 160ºC. Grease a 20 cm round cake pan with butter. Line base and side with baking paper.

2. Place the brown sugar, milk and butter in a microwave-safe bowl. Cook in microwave on high, stirring every minute, for 4-5 minutes or until the butter melts and the mixture is smooth.

3. Use a balloon whisk to whisk the combined flour and cocoa powder into the butter mixture. Whisk in the egg. Pour into the prepared pan. Bake for 55 minutes or until a skewer inserted into the center comes out clean. Set aside in the pan for 5 minutes to cool before transferring to a wire rack to cool completely.

4. To make the ganache, place the chocolate, cream and butter in a microwave-safe bowl. Cook in microwave on high, stirring every minute, for 2-3 minutes or until the chocolate melts and the mixture is smooth.

5. Use an electric beater to beat the extra butter in a bowl until pale and creamy. Beat in the icing sugar, malted milk powder and extra milk until fluffy. Beat in 1 ½ tablespoons ganache.

6. Set the remaining ganache aside for 1 hour 30 minutes or until thick, glossy and spreadable.

7. Meanwhile, use a large serrated knife to cut the cake horizontally into four layers. Place the cake base on a platter. Spread with one-third of the icing. Continue layering with the remaining cake and icing, finishing with cake. Cover and place in the fridge for 1 hour 30 minutes to chill.

8. Spread the ganache evenly over the top and side of the cake. Decorate with Maltesers.


Source: Taste.com.au


My First Barbie Doll Cake


I made this cake for my son's schoolmate. The base cake is chocolate with buttercream icing in yellow and blue combination. Assembling the cake was not that difficult as long as you have the tools, decorations will come smoothly along the way! I used an Ateco open star tip to pipe the rosette to cover the cake and a small star tip for the bodice. So without further ado
I braided her hair so it won't fall on the cake :)
Delivering the cake is more difficult than putting it all together. After smothering a mother load of icing it was quite heavy for the lifting. But who cares, the cake was cute and all the kids at the party adored it... they can't take their eyes off it and kept telling their moms that they too wanted the same cake on their party. Overall it's was such an adorable creation and I'm looking forward to make more in the future. 
I boxed the cake using my standard cake boxes, made a sort of a peep window using a cling wrap for easy viewing ;)
Finally the cake comes with cute belgian chocolate cupcakes. Piped with swirls and roses using basic star and rose tip.
And for the finishing touches, added some cupcake toppers to complete the barbie theme!

Happy baking...!


Salted Caramel Brownies

Yield: 12 SERVINGS 
Prep time: 20 MINUTES 
Cook time: 30 MINUTES

Ingredients:

4 ounces unsweetened chocolate; coarsely chopped
3/4 cup unsalted butter, cut into cubes
1 cup sugar
3 large eggs
1 teaspoon pure vanilla extract
1/2 teaspoon salt
1 cup all-purpose flour
9 Ghirardelli Dark Chocolate and Sea Salt Caramel Squares
1/2 cup Planters Salted Caramel Peanuts, chopped

Directions:

1. Preheat oven to 350 degrees. Line an 8×8 inch baking pan with foil and spray with nonstick cooking spray.

2. Microwave chocolate and butter in a large bowl microwave-safe bowl at medium (50% power) for 2-3 minutes or until butter is melted.

3. Stir until chocolate is melted. Whisk in sugar, eggs, vanilla and salt. Gradually add in flour; stir until just combined.

4. Spread 1/2 the batter into prepared pan. Add an even layer of Ghirardelli Dark Chocolate and Sea Salt Caramel Squares, sprinkle the peanuts over the batter and chocolate, and cover with remaining 1/2 of brownie batter.

5. Bake for 30-35 minutes; do not over bake.

6. Allow to cool thoroughly and cut into large squares.

Notes:
Salted Caramel Brownies are best served the day they are made; however, they will keep at room temperature in an airtight container for up to 3 days.

Source: Baking Addictions

ONE BOWL CHOCOLATE CAKE


INGREDIENTS

Unsalted butter, softened, for pans
3/4 cup unsweetened Dutch cocoa powder, plus more for pans
1 1/2 cups all-purpose flour
1 1/2 cups sugar
1 1/2 teaspoons baking soda
3/4 teaspoon baking powder
3/4 teaspoon salt
2 large eggs
3/4 cup low-fat buttermilk
3/4 cup warm water
3 tablespoons safflower oil
1 teaspoon pure vanilla extract

DIRECTIONS

  1. Preheat oven to 350 degrees. Butter two 8-inch round cake pans (2 inches deep); dust with cocoa. Sift cocoa, flour, sugar, baking soda, baking powder, and salt into the bowl of a mixer. Beat on low speed until just combined. Raise speed to medium, and add eggs, buttermilk, water, oil, and vanilla. Beat until smooth, about 3 minutes.
  2. Divide batter between pans. Bake until set and a toothpick inserted into the centers comes out clean, about 35 minutes. Let cool for 15 minutes. Turn out from pans. Transfer, faceup, to wire racks. Let cool completely.
  3. Spread 2 cups chocolate frosting onto top of 1 cooled layer. Top with remaining layer; frost top and sides with remaining 2 cups frosting.

CHOCOLATE FROSTING

INGREDIENTS

2 1/4 cups confectioners' sugar
1/4 cup unsweetened cocoa powder
Pinch of salt
6 ounces cream cheese, room temperature
1 1/2 sticks unsalted butter, softened
9 ounces bittersweet chocolate, melted and cooled slightly
3/4 cup creme fraiche, or sour cream

DIRECTIONS

  • Sift together sugar, cocoa, and salt.
  • Beat cream cheese and butter with a mixer on medium-high speed until smooth. 
  • Reduce speed to medium-low; gradually add sugar-cocoa mixture, and beat until combined. Pour in chocolate in a slow, steady stream. Add creme fraiche; beat until combined.
Source: Martha Bakes

See Some of the most Outrageous Wedding Cakes Ever!


While many have probably dreamed of their wedding cakes since childhood, they were most likely not wedding cakes quite like this. From a cake with a river running through it to a tower of cake dripping in 30 pounds of Swarovski crystals, Food Network is going from coast to coast to find the most incredible creations by the best cake artists in the country. These magicians can make anyone’s dream cake come true —— no matter the cost.

Souce: YouTube

6 Basic Piping Techniques

Learn how to pipe a cake with frosting from professional pastry chef Katie Rosenhouse in this Howcast cake decorating video.


And there are a few different basic techniques for piping. You can either start with a very French thing we do in my culinary school would be rosettes. So a very simple things is just to kind of push down and twist around and you have a beautiful little rosette. And you could do those kind of all around your cake as a cute little border. Just a few every now and again. Put some sprinkles. If you have your little round this is great. And by the way you can see that I'm not overfilling my bags. The longer you hold the bag with your hand that heat from you will start to melt to frosting, so just as little as you can get by with. And keep refilling as you go will keep your frosting nice and stiff. 

But all I want to do with this is if I was creating a border I would push and pull towards me you can see that that makes sort of a tear drop kind of a shape. And then go back in and push and pull towards me and same thing over and over again. And try to keep the pressure nice and even. It's like little beads. Making a little necklace and that's perfect as a border. You can go all around your cake. We'll actually get more into that in another video. 

But with this lovely thing, you could do... Let's see how this comes out. I mean with all of these you could kind of play around and do anything you like. But if you want to do like little swoops, very fun. Kind of all-around just big swoopy motions. And then my favorite is the star tip what these are called are shells. I never get to put frosting on the table. This is like every fantasy come true. Again you could kind of push and pull towards you make little shells. Or this is great for little rosettes or a hundred other things really. 

Always just have fun with it. If you wanted to do a little lace I could go back to my circle tip this is great also for little dots kind of all over. Or if I wanted to do a big squiggly, it's going to look crazy but once it's all over your cake, imagine how kind of cool that could look like all around the edge like very avante garde. We can get very whatever we want to do. But remember whatever you're doing whatever you're piping it's just frosting in a bag. So as long as your pushing in a nice even motion and getting a nice clean design in the way that you want it you'll always be a success.


Source: YouTube

How Much Do You Know About FLOUR

TRIVIA TIME

Flour Composition

•Ash content

-Bread Flour and All Purpose flour has 0.5% – 0.6% ash content.
-Soft Flour and Cake Flour has less than (<0.5%) ash content.

•Moisture content

- If the moisture content of flour is elevated, the flour will have a shorter shelf life and lower yield. Flour has been considered adulterated with water, under the federal standards of the United States, if the moisture content exceeded 13.5%. Recently this standard has been changed to 15 %.

•Gluten content

- Gliadin – when hydrated is viscous and can be stretched to a thin strand or     made to flow easily with gravity.
- Glutenin – when hydrates is very elastic.

•Starch content

- Starch make up about 62-73% of flour which is made entirely by Glucose a common six carbon sugar (C6H12O6).
- Starch is made up of two different molecules of glucose.
- Amylose, an essentially linear molecule. Common wheat starch is about 25% amylose.
- Amylopectin, which is distinguished from amylose in two ways. It is a highly branched and much larger. Composes 75% of starch. 

•Flour Enzymes
- Amylase, enzymes that catalyze the hydrolysis of the bonds between glucose units in amylose and amylopectin.
- α-amylase reduces starch to a series of branched and linear fragments called dextrins.
- β-Amylase reduces amylase primarily to maltose, a two glucose unit.

•Flour Additives
- Enrichments
- Oxidants, compounds added to strengthens the dough making it more elastic and enhancing its gas holding capacity (e.g. azodicarbonamide, calcium peroxide, and ascorbic acid.)

- Reducing Agents, compounds added to flour to reduce mixing time significantly and make dough easier to handle and process.


Source: Sonlie International

How to Start a Career in Cake Decorating & Pastry Arts

Careers in cake decorating and pastry arts require little to no formal education. Learn about the training, job duties and optional certification for bakers to see if this is the right career for you.

Essential Information

Individuals who enjoy baking and decorating cakes and pastries may find careers as cake decorators rewarding and fun. Cake decorators are specialized bakers. Culinary programs for aspiring cake decorators teach students how to blend colors and create shapes and figures. Aside from attending a culinary or technical school, bakers can be trained through apprenticeships and on-the-job training. Some certifications are also available in this field.
Step 1: Consider a Cake Decorating and Pastry Arts Career

Cake decorating is a hands-on industry. Possible positions for those interested in cake decorating and pastry arts may include pastry artisan, bakery owner, cake designer and caterer. A culinary degree in cake decorating provides students with the skills needed to open their own bakery or cake decorating shop, with apprenticeships available to help them obtain the knowledge they need to get started.

Step 2: Decide on a Training Program

Individuals interested in learning the art of cake decorating and creating pastry have several academic options, from courses and diploma programs to certificate and degree programs. Diploma and certificate programs often take one year to complete, while associate's degree programs usually require two years of theoretical study and practice. Students develop culinary skills that qualify them for employment at bakeries and specialty shops, as well as working on their own.

Step 3: Take Courses

In addition to cake decorating and pastry arts courses, participants learn about safety, sanitation, nutrition and business. While students take courses, a majority of the program entails hands-on learning where they actually bake and decorate their creations. Additionally, they take part in seminars or internships at approved businesses. Some of the creations they make include sugar and chocolate confections, miniature cakes, specialty desserts, artisan breads, icings and decorative frosting.

Step 4: Earn Certification

Although certification is not a requirement to work in cake decorating and pastry arts, it's a way graduates can demonstrate their education, experience and credentials to potential employers or customers. Various certifications are offered through the Retail Bakers of America and the American Culinary Federation. Examples of certifications include Certified Pastry Culinarian, Certified Working Pastry Chef, Certified Journey Baker, Certified Decorator and Certified Baker.

Step 5: Find Employment

In addition to learning to decorate cakes, graduates of culinary arts programs are qualified for entry-level positions in many food industries. According to the U.S. Bureau of Labor Statistics in May 2013, the median salary for bakers, including cake decorators, was $23,160 per year, with the bottom ten percent earning less than $18,000 and the top-paid ten percent bringing in over $37,000. Salaries vary somewhat by position and location.


Source: study.com

Basic French Macarons


NOTES

The basic meringue-style French macaron is merely the springboard for your wildest color and flavor combinations. Try adding a teaspoon of Dutch-process cocoa and red gel food coloring for a red velvet macaron, or a 1/4 teaspoon rose extract and pink gel food coloring for rose. Always add the dry flavorings to the almond meal/powdered sugar mixture and the extracts/gel color to the meringue.

INGREDIENTS

2/3 cup almond meal or ground almonds
1 1/2 cups powdered sugar
3 large egg whites, room temperature and preferably aged up to 3 days
5 tablespoons granulated sugar
1 teaspoon vanilla extract

DIRECTIONS
  1. Preheat the oven to 280ºF, and position 2 racks in the lower section of the oven. Line 2 rimmed baking sheets with parchment paper. If you have time, draw 1-inch circles on the back of each sheet, spacing the circles at least 1/2-inch apart.
  2. If your almond meal is very coarse, grind it with the powdered sugar in a food processor until fine. Sift the almond meal-powdered sugar mixture twice through a mesh sieve.
  3. Place egg whites in the bowl of a stand mixer (or use a hand mixer), and begin to beat on medium-high. When the eggs are frothy, gradually add granulated sugar 1 tablespoon at a time until fully incorporated. Continue to beat the egg white mixture until glossy and stiff peaks form when you lift the beaters. Gently stir in the vanilla extract. Be careful to not overbeat the meringue (e.g., the meringue takes on a clumpy texture).
  4. Add half of the sifted almond mixture, and gently fold it into the meringue using a flexible silicone spatula. Lift from the bottom, up around the sides, and toward the middle, being careful to not over-agitate the meringue and lose too much air. Once the almond mixture is predominantly incorporated, add the second half and repeat the folding motion.
  5. When the almond mixture is just incorporated, you will need to transform the batter into the appropriate texture. Using the flat of the spatula, "punch" down into the center of the batter, then scrape more batter from the sides to the center, and punch again. You will need to repeat this 10-15 times (or more, depending on your arm strength and the beginning texture of your batter) until the batter slowly and continuously drips back into the bowl when you scoop it up with the spatula. Think of the consistency of molten lava. For the best results, punch the batter a few times, check the consistency, then punch a few more times, etc. Do not make the batter too runny or the macarons won't rise as they should, and you could end up with oil stains on the surface.
  6. Pour batter into a pastry bag fitted with a 0.4-inch tip. In a pinch, you can also use a gallon-size Ziploc bag: just snip a teeny bit from one of the bottom corners. Twist and clip the top of the bag to avoid overflow. On your prepared baking sheets, pipe out 1-inch rounds in the circles you drew (remember to draw the circles on the back side of your parchment to avoid ink or pencil stains on your macarons!).
  7. Holding the baking sheet in both hands, rap each baking sheet firmly on the counter two or three times. This smooths out the tops and helps form the "pied" or frilly foot on the bottoms of the macarons. Allow the piped macarons to dry, uncovered, for at least 15 minutes. The macarons should form a very thin, smooth crust where, if you tap it lightly with your finger, the batter will not stick to your finger. If after 15 minutes, the batter is still sticky, let it dry longer. This may take up to an hour on humid days.
  8. Place both baking sheets in the oven and bake for 15-18 minutes. After the first 2 minutes, open the oven to allow any excess humidity to escape. Halfway through, swap oven racks and rotate the sheets for even baking. The macarons are done when they are baked all the way through and the shells are just hard. Take care to not underbake (insides will still be mushy) or overbake (tops will begin to brown). Remove them from the oven, and cool on baking sheet placed on a wire rack.
  9. When fully cooled, assemble the macarons with your choice of filling. The assembled macarons can be stored in an airtight container in the refrigerator for up to one week.

Source: Popsugar.com

No-Bake Chocolate and Peanut Butter Oatmeal Bars


INGREDIENTS

Vegetable oil cooking spray
9 ounces chocolate wafers (about 40 wafers), finely ground (2 cups)
1 1/2 cups old-fashioned oats
1 1/4 cups confectioners' sugar
1/4 teaspoon coarse salt
5 ounces (1 stick plus 2 tablespoons) unsalted butter, cut into small pieces
1 cup chunky peanut butter
3/4 cup plus 3 tablespoons smooth peanut butter
10 ounces semisweet chocolate, melted
1 1/2 ounces milk chocolate, melted

DIRECTIONS

  1. Coat a 9-by-13-inch baking dish with cooking spray. Line with parchment, leaving a 2-inch overhang on the 2 long sides.
  2. Combine wafers, oats, sugar, and salt in a large bowl. Melt butter in a medium saucepan over medium heat, then add chunky peanut butter and 3/4 cup smooth peanut butter, whisking until well combined. Add peanut butter mixture to wafer mixture, stirring until combined. Transfer to baking dish, and use the bottom of a measuring cup or an offset spatula to firmly press mixture into an even layer. Refrigerate for 30 minutes.
  3. Pour melted semisweet chocolate over chilled mixture and, using an offset spatula, spread into a thin layer that covers the entire surface. Refrigerate until hardened, at least 15 minutes.
  4. Heat remaining 3 tablespoons smooth peanut butter in a small saucepan until runny. Drizzle peanut butter over chilled chocolate. Drizzle melted milk chocolate over peanut butter. Refrigerate until hardened, about 15 minutes.
  5. Use parchment to lift out chilled block of bars. Run a sharp knife under hot water, dry well, and cut into 24 squares, wiping knife between cuts. Let bars stand at room temperature for 10 minutes before serving. (Sliced bars can be refrigerated for up to 1 week or frozen for up to 1 month.)

Source: Martha Bakes

Black Forest Cheesecake


Impress guests with a new take on the Black Forest Cake.

Makes 1 (9-inch) cake 
Prep Time 20 to 30 minutes, plus chilling time 
Baking Time 1 1/2 hours, plus resting time


For the Crust:

24 chocolate sandwich cookies (filling included; we used Oreo cookies)
1 tablespoon sugar
1/4 cup unsalted butter, melted

For the Chocolate Cheesecake Filling:

280 grams good-quality bittersweet chocolate, chopped finely
4 (8-ounce) packs cream cheese, at room temperature
1 cup plus 6 tablespoons sugar
5 medium eggs

For the Whipped Cream Cheese Icing:
1/3 cup cream cheese, softened
3 tablespoons sugar
1 teaspoon vanilla extract
1 cup whipping cream 
1/2 (595-gram) can cherry topping


  1. Preheat oven to 325°F. Grease a 9-inch springform pan with butter; set aside.
  2. Make the crust: Crush cookies until fi ne in a food processor. (You can also place the cookies in a zip-top bag and crush them with a rolling pin.) Combine crushed cookies, sugar, and butter in a bowl. Stir until well combined. Press onto the bottom of the prepared springform pan. Bake for 10 minutes; set aside and let cool.
  3. Make the filling: Place chocolate in a heatproof bowl. Place bowl over a pot of simmering water, making sure the water does not touch the bottom of the bowl. Melt chocolate completely, stirring occasionally. Let cool slightly.In the bowl of an electric mixer fitted with the paddle attachment, cream together cream cheese and sugar until light. Add eggs one at a time, beating well after each addition. Pour in melted chocolate; beat until combined.
  4. Pour filling into prepared crust; bake for 11/2 hours or until sides are cooked but center still jiggles when tapped. Remove cheesecake from the oven. Run a knife around the pan to loosen the edges.
  5. Return cheesecake to oven. Turn o¡ heat and leave the oven door ajar. Leave in the oven for 2 to 4 hours. Remove cheesecake from oven; chill for at least 4 hours before decorating.
  6. Un-mold cheesecake from pan and transfer to a plate or cake board; wrap with at least 3 layers of plastic wrap, then wrap completely with aluminum foil. Freeze for up to 1 month.
  7. Let cheesecake thaw overnight in the refrigerator.
  8. Make the whipped cream cheese icing: In the bowl of an electric mixer fitted with the paddle attachment, cream together cream cheese and sugar until light. Add vanilla and slowly pour in whipping cream. Continue beating until stiff peaks form.
  9. Spread cherry topping over cheesecake, leaving a 1/2-inch border along the edges. Pipe cream cheese icing on the border. Chill before serving. Refrigerate for up to 5 days in an airtight container.

How to make embossed teddy bear fondant cupcake toppers


I loved making the fondant. So I came up with these sweet teddy bear cupcake toppers. I have made them in pink and blue and they are just perfect for a baby shower.

This is what I use:
Rolled fondant icing
Tylo powder
Rolling pin
Tylo glue
Small brush
Gel paste colors
Small blossom cutter with ejector (PME)
Teddy bear embosser from the Cradle 3D set (PatchWork Cutters)
Round cookie cutter (40mm)
Round scallop cookie cutter 2 1/4″ (58mm)
Round Piping tip no 2
Round piping tip with a 10mm opening
A little cornstarch for dusting and a small knife (not showing) if you want to make the tiny leaves on the girl cupcake toppers

Start adding some tylo powder to your white base. This will help the cupcake toppers to hold the shape better when they are placed in the frosting.

Step 1:
Roll out the white fondant to a 3 mm thickness and cut out circles with the scallop cookie cutter. Place them on a lightly cornstarch dusted tray as you go.
Step 2:
Take the round piping tip and “cut out” a small hole in each of the scallops.

Step 3:
Use another color of rolled fondant for the center of the cupcake toppers and roll out the fondant to a 2mm thickness. Cut out circles with the 40mm cookie cutter.

Step 4:
Use the large teddy bear embosser from the Patchwork cutter Cradle set and emboss the “center circle”.

Step 5:
Next brush a little tylo glue on the back of the embossed circle and place it in the middle of the white base.

Step 6:
If you like, you can glue on a couple of small blossoms and tiny leaves for the girl cupcake toppers.

TIP! I make the leaves out of tiny pieces of rolled fondant. Roll them into a small tear drop shape and make a little vein with a small knife.

Step 7:
For the boys, I have made a small ball. Roll out your fondant thinly. Use the round piping tip with the 10mm opening and cut out some dots. Use the end of the no 2 piping tip and emboss the middle of the ball.

Step 8:
Attache the small ball with a little brush of tylo glue.

Let the cupcake toppers dry thoroughly before use.

Happy Caking!

How To Make Tiny Flower Pot Cakes


Sometimes you want to create a dessert that is both a show stopper and is deceptively easy. Well, these teeny weeny flower pot cake bites are just the thing.

Using a chocolate mold makes them fool proof and dirt “brownie” filling tricks the eye but couldn’t be simpler. Use pre made royal icing flowers for the topper or pipe your own if you’re feeling ambitious. Either way, it’s the perfect treat to wow your guests.

Here’s what you’ll need:

Flower Pot Chocolate Mold
Orange Candy Coating Discs
Paintbrush
Store Bought Brownies (with no icing) or Chocolate Cake Pop Filling
Chocolate Store Bought Icing in a Piping Bag
Ready-to-Use Royal Icing Flowers or Fondant Flowers

Paint And Fill The Pots

Start by crumbling up the brownies and set them aside in a bowl.


Then, in a microwave safe bowl, heat some orange candy coating discs on half power. Remove after 30 seconds and stir. Continue to heat and stir in 30 second intervals until the discs are melted. (Be careful to not overheat the discs because they will burn).


Use a paintbrush to coat each cavity of the flower pot mold. Use a dabbing motion if paint strokes are leaving too many thin spots. (Reheat the coating as necessary because it may get firm if you are working slowly).

Place the mold in the fridge for 5 minutes. Remove it from the fridge, hold it up to the light and then touch up any thin spots with additional coating so that you have a solid shell to put filling in.


On the back of your royal icing flower, pipe a dollop of icing and then adhere the flower to the top of the cake. Accent with leaves or additional flowers.


And there you have it! Cutie and Yummy... Happy Caking!


Source: thecakegirls

How to Pipe Using a Round Tip

There are endless possibilities when it comes to decorating a cake, this video tutorial will demonstrate various piping techniques using 1A or commonly called the round tip. Source: Martha Stewart

How to Crumb-Coat a Cake

This simple video demonstrates how you can easily frost your cake. The first stage is called "crumb coat" wherein a thin layer of icing is spread on a cake.

Source: Martha Stewart

Chocolate Tablea Cupcakes


The brown butter muscovado glaze adds the sweet notes to this decadent cupcake.

Makes 2 1/2 dozen cupcakes
Prep Time 20 minutes
Baking Time 20-22 minutes

¾ cup tablea chocolate,  finely ground
¼ cup cocoa powder, sifted
240 ml boiling water
¼ cup yogurt, at room temperature
¾ cup full cream milk, at room temperature
1 ¾ cup all-purpose flour 
1 ½ teaspoon baking soda
¼ teaspoon salt
½ cup butter, softened
1 ½ cup white sugar
3 tsp vanilla extract
3 large eggs, at room temperature
⅓ cup walnuts, toasted and chopped (optional)

For the brown butter muscovado glaze:
½ cup salted butter
1 cup muscovado sugar
3 tablespoons milk
2 cups powdered sugar, sifted


1. Make the cupcakes: Preheat oven to 350ºF. Line a muffin pan with cupcake liners. In a bowl, mix the tablea chocolate and cocoa powder together. Pour the hot water of the chocolate mixture, mix to combine. Refrigerate for 15 minutes or until it is at room temperature.

2. In a separate bowl, mix the yogurt and the milk together. Set aside.

3. In a medium sized bowl, sift the flour, baking soda, and salt together and mix well with a wire whisk. Set aside.

4. In a large mixing bowl, cream the butter, sugar, and vanilla on medium speed until light and fluffy. Add the eggs one by one, beating for 20 seconds after each addition or until just combined.

5. Slowly pour the chocolate mixture into the egg mixture while beating on medium speed until just combined. Do not overmix.

6. Add half of the flour mixture into the chocolate mixture and beat on low speed until combined. Add half of the milk mixture onto the chocolate mixture and beat on low speed until combined. Repeat with the rest of the ingredients. Do not overmix.

7. Pour the batter evenly into a prepared cupcake pan and bake for 20-22 minutes or until the cakes are firm to the touch. Let the cupcakes cool completely on a wire rack, about 1 hour.  

8. Make the glaze: In a medium-sized saucepan, melt the butter over low heat. Once it is melted, it will start bubbling and will start slowly browning. Let the butter brown for 4 to 5 minutes; watch it carefully because it can burn.

9. Once the butter is browned, add the muscovado sugar and constantly stir over low heat until the sugar is melted.

10. Add the milk and bring the mixture up to a boil, constantly stirring. Take it off the heat.

11. Let the mixture stand for 5 minutes, then gradually add the powdered sugar until it becomes a smooth spreadable glaze. Glaze the cupcakes as desired. If using, sprinkle toasted walnuts over the glaze immediately.  


Source: Yummy

Yema Chiffon Cake


Glaze a chiffon cake with an all-time fave: yema frosting!

Makes 1 (6-inch) 2-layer square cake or 1 (6-inch) 2-layer round cake 
Prep Time 15 minutes
Baking Time 40-45 minutes


4  egg whites
¼ cup white sugar
¼ teaspoon cream of tartar
1 ¼ cups flour
1 teaspoon baking powder
½ teaspoon salt
¼ cup white sugar
4 egg yolks
⅓ cup full cream milk
1 teaspoonvanilla
¼ cup vegetable oil
Grated zest of 1 lemon


For the yema filling: 
14 oz condensed milk
3  eggs yolks
½ teaspoon salt
½ teaspoon vanilla
Grated cheese, for garnish (optional)

1.  Position a rack in the center of the oven and preheat at 350ºF. Line the bottom of a 6-inch square cake pan with parchment paper.

2.  To make the chiffon cake, place the egg whites and cream of tartar in a clean mixing bowl and beat for 2 minutes or until they reach soft peaks. Put mixer on medium speed: slowly add sugar and whip for another 2 minutes until the whites are glossy and still hold soft peaks.

3.  In a separate bowl, combine the flour, baking powder, salt, and sugar and mix well with a wire whisk.

4.  In a large mixing bowl, beat the egg yolks, milks, vanilla, oil, and lemon zest until they are combined. Add the flour mixture and beat on medium until everything is well incorporated. 

5.  Using a rubber spatula, gently fold about ⅓ of the whipped whites into the flour mixture to lighten up the batter. Then gently fold in the remaining egg whites. Do not overmix. 

6.  Spread the batter evenly in your prepared pan and bake for 40-45 minutes or until the top springs back when pressed lightly and the top of the cake doesn't stick to your fingertips. Let the cake rest for a minute in the pan before turning it out to cool on a wire rack. Gently peel off the parchment and let the cake cool to room temperature.

7.  Make the yema filling: combine the condensed milk, egg yolks, salt, and vanilla in a medium saucepan and cook over low heat for 10 minutes or until the mixture thickens into a smooth and spreadable filling. 

8.  Cut through the cake into two even layers. Spread filling onto the first layer of cake and place the second layer of cake on top. Spread the rest of the yema filling on top of the cake and over the sides. Let the cake set in the refrigerator for an hour before serving. If desired, sprinkle grated cheese of the top of the cake.  


Source: Yummy.ph

Dark Chocolate Crinkles


Ingredients:

¼ cup black cocoa powder plus ½ cup cocoa powder
¾ cups vegetable oil
2 cups sugar
4 large eggs
1 tablespoon vanilla extract
2 1/3 cups all-purpose flour
2 teaspoons baking soda
1 teaspoon salt
1 cup confectioner’s sugar

Instructions:

  1.  In the bowl of an electric mixer with a whisk attachment, combine cocoa, oil and sugar. Add eggs and vanilla and mix until well combined.
  2. In a separate bowl, combine all-purpose flour, baking soda, and salt.
  3. Gradually add to the cocoa mixture and stir until just combined.
  4. Place the mixture in the refrigerator for at least an hour or until the dough is firm before using.
  5. Preheat oven to 350°F.
  6. Shape the dough into ¾-inch balls and roll in the confectioner’s sugar to coat completely.
  7. Place the balls in a lightly greased cookie sheet or a cookie sheet lined with parchment paper. Arrange the balls about 2 inches apart.
  8.  Bake the cookies until puffed and cracked on the top, about 10-12 minutes.
  9. Cookies should look undone and still soft in the center. The internal heat will cook the cookies while cooling down and will keep them moist and chewy on the inside and crisp on the outside. Cool completely.

Tip

Black cocoa powder is a type of alkalized, Dutch-processed cocoa. It is available at specialty baking supply stores like SweetCraft and Chocolate Lovers. To make the usual chocolate crinkles, just use ¾ cup cocoa powder.

Brazo de Mercedes


INGREDIENTS:

10 large eggs
1/2 tsp cream of tartar
1 tsp pure vanilla extract
3/4 c sugar
3 Tbsp confectioners’ sugar
14 oz sweetened condensed milk

INSTRUCTIONS:

  1. Separate the egg whites from the yolk.
  2. In a bowl, combine egg whites and cream of tartar. Beat using an electric mixer until soft peaks form.
  3. Make the meringue by gradually adding the granulated sugar while mixing the ingredients. Mix until the texture is semi-firm.
  4. Preheat the oven to 350º Fahrenheit.
  5. Place wax paper on top of a cookie sheet or large rectangular baking pan and grease the surface.
  6. Place the meringue on top of the greased wax paper then spread evenly using a spatula.
  7. Bake the meringue for 20 to 22 minutes or until the color of the top part turns light to medium brown.
  8. While the meringue is in the oven, make the filling by combining the egg yolks and condensed milk in a small cooking pot. Cook the mixture on the stove (low heat) while continuously stirring until the texture becomes thick.
  9. Add the vanilla extract to the condensed milk and egg yolk mixture, turn off the heat, and mix thoroughly. Set aside.
  10. Remove the meringue from the oven and cool down for a few minutes.
  11. Sprinkle the confectioners sugar on top of the meringue then place wax paper on the top part of the meringue, place a similar sized baking pan or tray on top. Note: The meringue should now be in the middle of two baking trays.
  12. Flip the trays. The tray you just placed on top should now be under. Remove the baking tray that is now on top and the wax paper (you should now see the opposite side of the baked meringue) then spread the filling (cooked egg yolks, condensed milk, and vanilla extract mixture) over the meringue.
  13. Roll the meringue starting at the longest side. Make sure that the filling is rolled inward and in the center of the roll.
  14. Transfer to a serving plate, slice then serve.


Source : Foodipino

Photo Credit: kawalingpinoy.com

Maltesers Cake


INGREDIENTS:

 200g (1 cup, firmly packed) brown sugar
 185ml (¾ cup) milk
 125g butter, chopped
 115g (¾ cup) self-raising flour
 75g (½ cup) plain flour
 50g (½ cup) cocoa powder
 3 eggs, lightly whisked
 185g butter, extra, at room temperature
 345g (2 ¼ cups) icing sugar mixture
 95g (¾ cup) malted milk powder
 1 tablespoon milk, extra
 465g Maltesers

 Ganache
 300g dark cooking chocolate, finely chopped
 125ml (½ cup) thickened cream
 30g butter

DIRECTIONS:

1. Preheat oven to 160ºC. Grease a 20 cm round cake pan with butter. Line base and side with baking paper.

2. Place the brown sugar, milk and butter in a microwave-safe bowl. Cook in microwave on high, stirring every minute, for 4-5 minutes or until the butter melts and the mixture is smooth.

3. Use a balloon whisk to whisk the combined flour and cocoa powder into the butter mixture. Whisk in the egg. Pour into the prepared pan. Bake for 55 minutes or until a skewer inserted into the center comes out clean. Set aside in the pan for 5 minutes to cool before transferring to a wire rack to cool completely.

4. To make the ganache, place the chocolate, cream and butter in a microwave-safe bowl. Cook in microwave on high, stirring every minute, for 2-3 minutes or until the chocolate melts and the mixture is smooth.

5. Use an electric beater to beat the extra butter in a bowl until pale and creamy. Beat in the icing sugar, malted milk powder and extra milk until fluffy. Beat in 1 ½ tablespoons ganache.

6. Set the remaining ganache aside for 1 hour 30 minutes or until thick, glossy and spreadable.

7. Meanwhile, use a large serrated knife to cut the cake horizontally into four layers. Place the cake base on a platter. Spread with one-third of the icing. Continue layering with the remaining cake and icing, finishing with cake. Cover and place in the fridge for 1 hour 30 minutes to chill.

8. Spread the ganache evenly over the top and side of the cake. Decorate with Maltesers.


Source: Taste.com.au


Ryken Chocolates Copyright 2009 Sweet Cupcake Designed by Ipiet Templates Image by Tadpole's Notez