Wednesday 22 April 2015

How to make embossed teddy bear fondant cupcake toppers

0 comments


I loved making the fondant. So I came up with these sweet teddy bear cupcake toppers. I have made them in pink and blue and they are just perfect for a baby shower.

This is what I use:
Rolled fondant icing
Tylo powder
Rolling pin
Tylo glue
Small brush
Gel paste colors
Small blossom cutter with ejector (PME)
Teddy bear embosser from the Cradle 3D set (PatchWork Cutters)
Round cookie cutter (40mm)
Round scallop cookie cutter 2 1/4″ (58mm)
Round Piping tip no 2
Round piping tip with a 10mm opening
A little cornstarch for dusting and a small knife (not showing) if you want to make the tiny leaves on the girl cupcake toppers

Start adding some tylo powder to your white base. This will help the cupcake toppers to hold the shape better when they are placed in the frosting.

Step 1:
Roll out the white fondant to a 3 mm thickness and cut out circles with the scallop cookie cutter. Place them on a lightly cornstarch dusted tray as you go.
Step 2:
Take the round piping tip and “cut out” a small hole in each of the scallops.

Step 3:
Use another color of rolled fondant for the center of the cupcake toppers and roll out the fondant to a 2mm thickness. Cut out circles with the 40mm cookie cutter.

Step 4:
Use the large teddy bear embosser from the Patchwork cutter Cradle set and emboss the “center circle”.

Step 5:
Next brush a little tylo glue on the back of the embossed circle and place it in the middle of the white base.

Step 6:
If you like, you can glue on a couple of small blossoms and tiny leaves for the girl cupcake toppers.

TIP! I make the leaves out of tiny pieces of rolled fondant. Roll them into a small tear drop shape and make a little vein with a small knife.

Step 7:
For the boys, I have made a small ball. Roll out your fondant thinly. Use the round piping tip with the 10mm opening and cut out some dots. Use the end of the no 2 piping tip and emboss the middle of the ball.

Step 8:
Attache the small ball with a little brush of tylo glue.

Let the cupcake toppers dry thoroughly before use.

Happy Caking!

Tuesday 21 April 2015

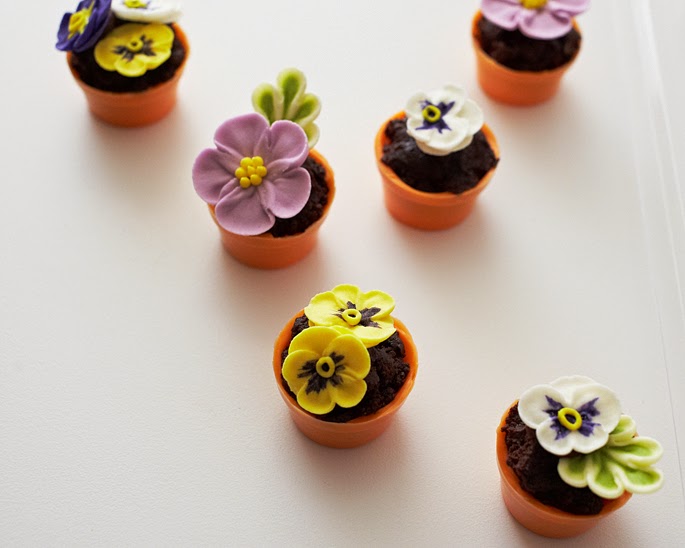
How To Make Tiny Flower Pot Cakes

0 comments

Sometimes you want to create a dessert that is both a show stopper and is deceptively easy. Well, these teeny weeny flower pot cake bites are just the thing.

Using a chocolate mold makes them fool proof and dirt “brownie” filling tricks the eye but couldn’t be simpler. Use pre made royal icing flowers for the topper or pipe your own if you’re feeling ambitious. Either way, it’s the perfect treat to wow your guests.

Here’s what you’ll need:

Flower Pot Chocolate Mold
Orange Candy Coating Discs
Paintbrush
Store Bought Brownies (with no icing) or Chocolate Cake Pop Filling
Chocolate Store Bought Icing in a Piping Bag
Ready-to-Use Royal Icing Flowers or Fondant Flowers

Paint And Fill The Pots

Start by crumbling up the brownies and set them aside in a bowl.


Then, in a microwave safe bowl, heat some orange candy coating discs on half power. Remove after 30 seconds and stir. Continue to heat and stir in 30 second intervals until the discs are melted. (Be careful to not overheat the discs because they will burn).


Use a paintbrush to coat each cavity of the flower pot mold. Use a dabbing motion if paint strokes are leaving too many thin spots. (Reheat the coating as necessary because it may get firm if you are working slowly).

Place the mold in the fridge for 5 minutes. Remove it from the fridge, hold it up to the light and then touch up any thin spots with additional coating so that you have a solid shell to put filling in.


On the back of your royal icing flower, pipe a dollop of icing and then adhere the flower to the top of the cake. Accent with leaves or additional flowers.


And there you have it! Cutie and Yummy... Happy Caking!


Source: thecakegirls

Sunday 19 April 2015

How to Pipe Using a Round Tip

0 comments
There are endless possibilities when it comes to decorating a cake, this video tutorial will demonstrate various piping techniques using 1A or commonly called the round tip. Source: Martha Stewart

How to Crumb-Coat a Cake

0 comments
This simple video demonstrates how you can easily frost your cake. The first stage is called "crumb coat" wherein a thin layer of icing is spread on a cake.

Source: Martha Stewart

Chocolate Tablea Cupcakes

0 comments

The brown butter muscovado glaze adds the sweet notes to this decadent cupcake.

Makes 2 1/2 dozen cupcakes
Prep Time 20 minutes
Baking Time 20-22 minutes

¾ cup tablea chocolate,  finely ground
¼ cup cocoa powder, sifted
240 ml boiling water
¼ cup yogurt, at room temperature
¾ cup full cream milk, at room temperature
1 ¾ cup all-purpose flour 
1 ½ teaspoon baking soda
¼ teaspoon salt
½ cup butter, softened
1 ½ cup white sugar
3 tsp vanilla extract
3 large eggs, at room temperature
⅓ cup walnuts, toasted and chopped (optional)

For the brown butter muscovado glaze:
½ cup salted butter
1 cup muscovado sugar
3 tablespoons milk
2 cups powdered sugar, sifted


1. Make the cupcakes: Preheat oven to 350ºF. Line a muffin pan with cupcake liners. In a bowl, mix the tablea chocolate and cocoa powder together. Pour the hot water of the chocolate mixture, mix to combine. Refrigerate for 15 minutes or until it is at room temperature.

2. In a separate bowl, mix the yogurt and the milk together. Set aside.

3. In a medium sized bowl, sift the flour, baking soda, and salt together and mix well with a wire whisk. Set aside.

4. In a large mixing bowl, cream the butter, sugar, and vanilla on medium speed until light and fluffy. Add the eggs one by one, beating for 20 seconds after each addition or until just combined.

5. Slowly pour the chocolate mixture into the egg mixture while beating on medium speed until just combined. Do not overmix.

6. Add half of the flour mixture into the chocolate mixture and beat on low speed until combined. Add half of the milk mixture onto the chocolate mixture and beat on low speed until combined. Repeat with the rest of the ingredients. Do not overmix.

7. Pour the batter evenly into a prepared cupcake pan and bake for 20-22 minutes or until the cakes are firm to the touch. Let the cupcakes cool completely on a wire rack, about 1 hour.  

8. Make the glaze: In a medium-sized saucepan, melt the butter over low heat. Once it is melted, it will start bubbling and will start slowly browning. Let the butter brown for 4 to 5 minutes; watch it carefully because it can burn.

9. Once the butter is browned, add the muscovado sugar and constantly stir over low heat until the sugar is melted.

10. Add the milk and bring the mixture up to a boil, constantly stirring. Take it off the heat.

11. Let the mixture stand for 5 minutes, then gradually add the powdered sugar until it becomes a smooth spreadable glaze. Glaze the cupcakes as desired. If using, sprinkle toasted walnuts over the glaze immediately.  


Source: Yummy

Yema Chiffon Cake

0 comments

Glaze a chiffon cake with an all-time fave: yema frosting!

Makes 1 (6-inch) 2-layer square cake or 1 (6-inch) 2-layer round cake 
Prep Time 15 minutes
Baking Time 40-45 minutes


4  egg whites
¼ cup white sugar
¼ teaspoon cream of tartar
1 ¼ cups flour
1 teaspoon baking powder
½ teaspoon salt
¼ cup white sugar
4 egg yolks
⅓ cup full cream milk
1 teaspoonvanilla
¼ cup vegetable oil
Grated zest of 1 lemon


For the yema filling: 
14 oz condensed milk
3  eggs yolks
½ teaspoon salt
½ teaspoon vanilla
Grated cheese, for garnish (optional)

1.  Position a rack in the center of the oven and preheat at 350ºF. Line the bottom of a 6-inch square cake pan with parchment paper.

2.  To make the chiffon cake, place the egg whites and cream of tartar in a clean mixing bowl and beat for 2 minutes or until they reach soft peaks. Put mixer on medium speed: slowly add sugar and whip for another 2 minutes until the whites are glossy and still hold soft peaks.

3.  In a separate bowl, combine the flour, baking powder, salt, and sugar and mix well with a wire whisk.

4.  In a large mixing bowl, beat the egg yolks, milks, vanilla, oil, and lemon zest until they are combined. Add the flour mixture and beat on medium until everything is well incorporated. 

5.  Using a rubber spatula, gently fold about ⅓ of the whipped whites into the flour mixture to lighten up the batter. Then gently fold in the remaining egg whites. Do not overmix. 

6.  Spread the batter evenly in your prepared pan and bake for 40-45 minutes or until the top springs back when pressed lightly and the top of the cake doesn't stick to your fingertips. Let the cake rest for a minute in the pan before turning it out to cool on a wire rack. Gently peel off the parchment and let the cake cool to room temperature.

7.  Make the yema filling: combine the condensed milk, egg yolks, salt, and vanilla in a medium saucepan and cook over low heat for 10 minutes or until the mixture thickens into a smooth and spreadable filling. 

8.  Cut through the cake into two even layers. Spread filling onto the first layer of cake and place the second layer of cake on top. Spread the rest of the yema filling on top of the cake and over the sides. Let the cake set in the refrigerator for an hour before serving. If desired, sprinkle grated cheese of the top of the cake.  


Source: Yummy.ph

Saturday 18 April 2015

Dark Chocolate Crinkles

0 comments

Ingredients:

¼ cup black cocoa powder plus ½ cup cocoa powder
¾ cups vegetable oil
2 cups sugar
4 large eggs
1 tablespoon vanilla extract
2 1/3 cups all-purpose flour
2 teaspoons baking soda
1 teaspoon salt
1 cup confectioner’s sugar

Instructions:

  1.  In the bowl of an electric mixer with a whisk attachment, combine cocoa, oil and sugar. Add eggs and vanilla and mix until well combined.
  2. In a separate bowl, combine all-purpose flour, baking soda, and salt.
  3. Gradually add to the cocoa mixture and stir until just combined.
  4. Place the mixture in the refrigerator for at least an hour or until the dough is firm before using.
  5. Preheat oven to 350°F.
  6. Shape the dough into ¾-inch balls and roll in the confectioner’s sugar to coat completely.
  7. Place the balls in a lightly greased cookie sheet or a cookie sheet lined with parchment paper. Arrange the balls about 2 inches apart.
  8.  Bake the cookies until puffed and cracked on the top, about 10-12 minutes.
  9. Cookies should look undone and still soft in the center. The internal heat will cook the cookies while cooling down and will keep them moist and chewy on the inside and crisp on the outside. Cool completely.

Tip

Black cocoa powder is a type of alkalized, Dutch-processed cocoa. It is available at specialty baking supply stores like SweetCraft and Chocolate Lovers. To make the usual chocolate crinkles, just use ¾ cup cocoa powder.

Brazo de Mercedes

0 comments

INGREDIENTS:

10 large eggs
1/2 tsp cream of tartar
1 tsp pure vanilla extract
3/4 c sugar
3 Tbsp confectioners’ sugar
14 oz sweetened condensed milk

INSTRUCTIONS:

  1. Separate the egg whites from the yolk.
  2. In a bowl, combine egg whites and cream of tartar. Beat using an electric mixer until soft peaks form.
  3. Make the meringue by gradually adding the granulated sugar while mixing the ingredients. Mix until the texture is semi-firm.
  4. Preheat the oven to 350º Fahrenheit.
  5. Place wax paper on top of a cookie sheet or large rectangular baking pan and grease the surface.
  6. Place the meringue on top of the greased wax paper then spread evenly using a spatula.
  7. Bake the meringue for 20 to 22 minutes or until the color of the top part turns light to medium brown.
  8. While the meringue is in the oven, make the filling by combining the egg yolks and condensed milk in a small cooking pot. Cook the mixture on the stove (low heat) while continuously stirring until the texture becomes thick.
  9. Add the vanilla extract to the condensed milk and egg yolk mixture, turn off the heat, and mix thoroughly. Set aside.
  10. Remove the meringue from the oven and cool down for a few minutes.
  11. Sprinkle the confectioners sugar on top of the meringue then place wax paper on the top part of the meringue, place a similar sized baking pan or tray on top. Note: The meringue should now be in the middle of two baking trays.
  12. Flip the trays. The tray you just placed on top should now be under. Remove the baking tray that is now on top and the wax paper (you should now see the opposite side of the baked meringue) then spread the filling (cooked egg yolks, condensed milk, and vanilla extract mixture) over the meringue.
  13. Roll the meringue starting at the longest side. Make sure that the filling is rolled inward and in the center of the roll.
  14. Transfer to a serving plate, slice then serve.


Source : Foodipino

Photo Credit: kawalingpinoy.com

Maltesers Cake

0 comments

INGREDIENTS:

 200g (1 cup, firmly packed) brown sugar
 185ml (¾ cup) milk
 125g butter, chopped
 115g (¾ cup) self-raising flour
 75g (½ cup) plain flour
 50g (½ cup) cocoa powder
 3 eggs, lightly whisked
 185g butter, extra, at room temperature
 345g (2 ¼ cups) icing sugar mixture
 95g (¾ cup) malted milk powder
 1 tablespoon milk, extra
 465g Maltesers

 Ganache
 300g dark cooking chocolate, finely chopped
 125ml (½ cup) thickened cream
 30g butter

DIRECTIONS:

1. Preheat oven to 160ºC. Grease a 20 cm round cake pan with butter. Line base and side with baking paper.

2. Place the brown sugar, milk and butter in a microwave-safe bowl. Cook in microwave on high, stirring every minute, for 4-5 minutes or until the butter melts and the mixture is smooth.

3. Use a balloon whisk to whisk the combined flour and cocoa powder into the butter mixture. Whisk in the egg. Pour into the prepared pan. Bake for 55 minutes or until a skewer inserted into the center comes out clean. Set aside in the pan for 5 minutes to cool before transferring to a wire rack to cool completely.

4. To make the ganache, place the chocolate, cream and butter in a microwave-safe bowl. Cook in microwave on high, stirring every minute, for 2-3 minutes or until the chocolate melts and the mixture is smooth.

5. Use an electric beater to beat the extra butter in a bowl until pale and creamy. Beat in the icing sugar, malted milk powder and extra milk until fluffy. Beat in 1 ½ tablespoons ganache.

6. Set the remaining ganache aside for 1 hour 30 minutes or until thick, glossy and spreadable.

7. Meanwhile, use a large serrated knife to cut the cake horizontally into four layers. Place the cake base on a platter. Spread with one-third of the icing. Continue layering with the remaining cake and icing, finishing with cake. Cover and place in the fridge for 1 hour 30 minutes to chill.

8. Spread the ganache evenly over the top and side of the cake. Decorate with Maltesers.


Source: Taste.com.au

Chocolate Strawberry Shortcakes

0 comments

INGREDIENTS:

Chocolate shortcakes:
1 ½ cups all-purpose flour
½ cup unsweetened cocoa powder
1 tablespoon baking powder
½ cup sugar
½ tsp kosher salt
1 large egg
1 cup whipping cream
8 tablespoons unsalted butter, melted and cooled slightly
1 teaspoon pure vanilla extract

Strawberries:
1 ½ pounds ripe strawberries, hulled and sliced
¼ cup sugar
2 tablespoons fresh orange juice
2 tablespoons Grand Marnier or other orange liqueur

Whipped cream:
1 cup heavy whipping cream
1 teaspoon pure vanilla extract
2 tablespoons sugar

DIRECTIONS: 

1. In a bowl, stir together the strawberries, sugar, orange juice, and Grand Marnier. Set aside for 30 minutes to macerate.

2. Position a rack in the upper third of the oven and preheat the oven to 375°F. Line a baking sheet with parchment paper.

3. In a large bowl, sift together the flour, cocoa, and baking powder. Whisk in the sugar and salt. In another bowl, whisk together the egg, cream, butter, and vanilla. Stir the cream mixture into the flour mixture. 

4. Using a tablespoon, drop 6 to 8 shortcakes onto the prepared baking sheet, spacing the mounds evenly (the shortcakes will expand slightly as they bake).Bake the shortcakes until a toothpick inserted into the center comes out clean, about 15 to 18 minutes. Transfer to a rack and let cool.

5. To whip the cream: In the bowl of a mixer fitted with the whip attachment, on medium-high speed, beat the cream, sugar, and vanilla to medium-stiff peaks. Do not overbeat.

6. To serve, split the shortcakes horizontally. Top the bottom half with a big spoonful of strawberries (including some of the juices) and a big dollop of whipped cream. Top with the top layer of shortcake, and spoon some berries over the top. Top with more whipped cream, drizzle with some of the juices, and serve.


Source: Chow 

Monday 13 April 2015

Caramel Filled Cupcakes with Whipped Caramel Frosting Recipe

0 comments

Ingredients

1 yellow cake mix (I prefer Pillsbury)
3 whole eggs
½ cup water
⅓ cup oil
1 cup sour cream (8 ounces)
1 small box instant vanilla pudding

For the filling:

1 stick butter, melted
1 cup packed light brown sugar
1/4 cup milk
1 teaspoon pure vanilla extract
For the frosting:
2 sticks butter
1 cup packed dark brown sugar
⅓ cup heavy cream, or more if needed
16 oz. confectioners’ sugar (~ 4 cups)
1 teaspoon pure vanilla extract

Instructions

  1. For the cupcakes, thoroughly mix all ingredients together. Bake at 325° for about 18 minutes.
  2. Allow the cupcakes to cool while you make the filling (or use pre-made Caramel sauce from a jar, such as Smuckers). When cool, use an apple corer to remove the center and prepare for filling.
  3. To make the filling (if you're not using pre-made), add the butter, brown sugar and milk to a small saucepan. Heat until the butter melts and the sugar dissolves, about 3-5 minutes over medium heat. Remove from heat and stir in the vanilla extract. Allow to cool slightly and it will start to thicken. Spoon it into the cupcake holes.
  4. For the frosting, melt the butter in a saucepan over medium heat and add in the brown sugar and cream. Heat until it boils, then remove it from the heat and transfer to a mixing bowl. Slowly add in the confectioners sugar while mixing. Add the vanilla. Continue mixing until the frosting is completely cooled and is whipped up light and fluffy.
  5. Frost the cupcakes (I used a large round tip) and enjoy!!

Happy Caking!


Source: Cake Journal

Lemon Vanilla Cupcake

0 comments

Ingredients

½ cup (120 grams) butter, room temperature
Note: I do not use unsalted butter, whenever I bake. but you can of course use unsalted butter if you prefer. (Just add ¼ tsp of salt to the recipe)
¾ cup (135 grams) white granulated sugar
3 eggs
Seeds from 1 vanilla bean
Zest from 1 large lemon
1 ½ cup (200 grams) all purpose flour
2 tsp baking powder
¼ cup (60 ml) milk or cream, room temperature
12 cup muffin pan
12 cupcake paper cases

Instructions

  1. Preheat oven to 350º F (175 C) Do not use the fan.
  2. In a bowl, mix together flour and baking powder with a whisk and set aside.
  3. Cream the following: butter, white sugar, eggs, vanilla seeds and the lemon zest. Using your hand or kitchen mixer. Cream until well combined. Scrape down the sides of the bowl when needed.
  4. Sift in half of the flour mixture and mix just until combined. Then add the milk and give the batter a quick mix before adding the last part of the flour mixture. Give the batter a final mix until it is smooth.
  5. Fill the cupcake paper cases ¾ full with the lemon vanilla batter and bake the cupcakes in the middle of the oven for about 20-25 minutes. Remember to check with a cake tester/toothpick to see if the cupcakes are done.
  6. Transfer the cupcakes from the pan to a cooling rack and let them cool completely before frosting.

Notes:

They are best freshly baked but can be stored in a air tight container for two days.

Source: Cake Journal

Tuesday 7 April 2015

How To Make A Blue Velvet Naked Cake

0 comments

To make this cake, you will need the following ingredients:

Vegan blue velvet cake:

2 1/4 cups all-purpose flour
1 1/4 cups sugar
1 1/2 cup soy milk or almond milk
3/4 cup light olive oil
1 tbsp vanilla extract (the best quality you can find!)
3/4 tsp baking soda
1/8 tsp salt
3 tbsp lemon juice
Blue gel coloring

Vegan buttercream icing:

3/4 cup shortening
3/4 cup vegan margarine
4 – 4 1/2 cups powdered sugar
1/4 cup almond milk or soy milk
1 tbsp vanilla extract (the best quality you can find!)
Yellow gel coloring

Decorating:

Fresh flowers
Blackberries
Tip 1M

These are the instructions for the blue velvet cake:

Step 1:
Add all the wet ingredients (milk, oil, vanilla extract and lemon juice) in a mixing bowl.


Step 2:
Mix everything until you have a fluffy mixture.


Step 3:
In a separate bowl, sift all the dry ingredients (flour, sugar, salt and baking soda). Dump the sifted dry ingredients into your bowl of wet mixture.


Step 4:
Mix everything until just combined.
DON’T overmix!


Step 5:
Add blue gel coloring in the batter and mix thoroughly with a wooden spoon.
Pour the batter in two 8×2 greased and floured round cake pans.
Bake at 350 degrees for 40-45 minutes or until an inserted toothpick comes out clean.


These are the instructions for the vegan icing:

Step 1:
In a mixing bowl, cream margarine and shortening until you have a light and creamy mixture with no lumps.


Step 2:
Add powdered sugar and milk and mix at low speed until you have a spreadable consistency. If you feel that your icing consistency is too thin, add some more powdered sugar to thicken it (1/4 cup at a time).
If you feel that your icing consistency is too thick, add some more milk to thin it out (1 tbsp at a time).


Step 3:
Finally, add yellow gel coloring and mix again.


Once your cakes and icing are prepared, assemble the cake…
Start off by leveling your cakes.
Place one cake on a cake board.
Use Tip 1M to frost the top of the cake and place some blackberries as well.
Place the other half of the cake on top of the icing and blackberries now.
Use Tip 1M again to frost the top of the cake.
Finally, just decorate the top with fresh flowers and blackberries.
And you are done!


Happy Caking! 


Source: Cake Journal

Thursday 2 April 2015

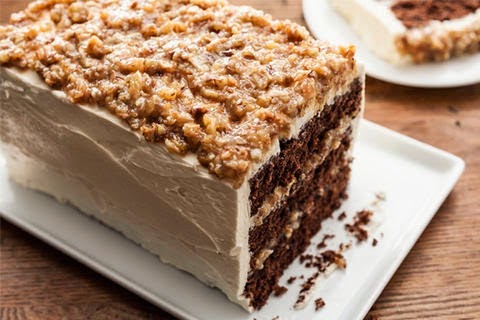
German Chocolate Cake

0 comments

INGREDIENTS

For the cake:

    2   ounces Baker’s German’s Sweet Chocolate, coarsely chopped
    1   cup all-purpose flour
    ⅓   cup Dutch-process cocoa powder
    ¼  teaspoon baking soda
    ¼  teaspoon fine salt
    8   tablespoons unsalted butter (1 stick), at room temperature, plus more for          coating the baking dish
    1   cup granulated sugar
    2   large eggs, at room temperature
    1   large egg yolk, at room temperature
    1   teaspoon vanilla extract
    ½  cup low-fat buttermilk, at room temperature

For the filling:

    ¾  cup heavy cream
    ½  cup granulated sugar
    2   large egg yolks
    1¼ cups unsweetened coconut flakes, toasted and crumbled
    ¾  cup pecans, toasted and finely chopped
    3   tablespoons unsalted butter, cut into small pieces
    ¼  teaspoon fine salt

To assemble:

    Vanilla Buttercream Frosting, at room temperature

INSTRUCTIONS

For the cake: 

  1. Heat the oven to 350°F and arrange a rack in the middle. Coat a 13-by-9-inch baking dish with butter; set aside.
  2. Fill a small saucepan with 1 inch of water and bring it to a simmer over medium-high heat. Place the chocolate in a stainless steel or glass bowl, set the bowl over the simmering water (be sure it’s not touching the water), and stir until the chocolate is completely melted, about 3 to 5 minutes; set aside to cool slightly.
  3. Combine the flour, cocoa powder, baking soda, and salt in a large bowl and whisk to aerate and break up any lumps; set aside.
  4. In the bowl of a stand mixer fitted with a paddle attachment, cream the measured butter and sugar on medium-high speed until light in color and fluffy, about 4 minutes. Add the eggs, 1 at a time, then the egg yolk, beating after each addition until evenly incorporated. Stop the mixer and scrape down the sides of the bowl using a rubber spatula. Add the vanilla and melted chocolate and return the mixer to medium-high speed, mixing until evenly combined, about 30 seconds.
  5. Reduce the speed to medium low and add a third of the reserved dry ingredients. When just incorporated, add half of the buttermilk. Repeat, scraping down the bowl at least once and ending with the last third of the dry ingredients.
  6. Pour the batter into the prepared dish, smooth the top with the spatula, and bake until a toothpick inserted in the middle comes out with only a few crumbs, about 35 minutes. Cool completely in the pan on a wire rack, about 1 hour. Meanwhile make the filling.

For the filling:

  1. Combine the cream, sugar, and egg yolks in a medium saucepan over medium heat, stirring constantly until the mixture thickens and coats the back of the spoon, about 8 minutes.
  2. Transfer to a medium bowl, add the remaining ingredients, and stir until the butter has melted and is evenly incorporated. Let cool to room temperature.

To assemble:

  1. Once the cake has cooled, carefully transfer it to a cutting board and slice it into thirds (the pieces should measure about 4 inches wide by 9 inches long), trimming as necessary to make the sections as even as possible.
  2. Spread about a third of the filling evenly over the top of 1 piece of cake, and another third of the filling over the top of a second piece. Stack the 2 pieces and place the last, unadorned piece on top. Set the last third of the filling aside.
  3. Using about a third of the vanilla buttercream, frost the sides and top of the cake. (Don’t worry about looks at this point—this is just a base coat, or crumb layer, and it will be covered up later.) Place the cake in the freezer for about 10 minutes, or the refrigerator for about 20 minutes, until the frosting is set up and slightly hard. Evenly spread the remaining frosting over the top and sides of the cake, then evenly spread the remaining third of the filling on top of the cake.

Source: Chow

Red Velvet Crinkles

0 comments

INGREDIENTS

3 cups                       All Purpose Flour
¼ cup                       Unsweetened Cocoa Powder
2 teaspoons               Baking Powder
¾ teaspoons              Salt
¾ cup                       Softened Butter
1 ⅓ cup                     Sugar
3 pieces                     Eggs
1 ½ teaspoons           Vanilla Extract
5 teaspoons               Liquid Food Coloring
1 Tablespoon             White Vinegar
¼ teaspoon               Baking Soda
1 cup                        Chocolate Chips
1 cup                        Icing Sugar

DIRECTIONS
DIRECTIONS
  1. Preheat oven to 190 degrees Celsius.
  2. Combine flour, cocoa powder, baking powder and salt.  Mix using a wire whisk until everything is incorporated.  Set aside.
  3. In a separate bowl, beat the butter using an electric mixer for 3 minutes.  Gradually add the sugar and beat until you have a pale yellow mixture.  Add egg one at a time beating 3 minutes upon each addition.  Add vanilla extract and food color and beat for another 3 minutes. 
  4. Mix in the flour mixture a half cup at a time.  Be sure that the flour mixture is well incorporated into the batter.
  5. Combine vinegar and baking soda and add to the batter.  Mix for another 2 minutes.
  6. Add in the chocolate chips and mix using a wooden spoon or a spatula. 
  7. Refrigerate for at least four hours or overnight.  This is an important step.  Like breads, we want our batter to rest.  Cold batter is also easy to work with compared to room temperature sticky batter.  So be patient.
  8. Sift icing sugar in a bowl.  Scoop the red velvet crinkle batter batter using a 1 ounce ice cream scooper.  Roll it on the icing sugar and place on a baking pan lined with baking paper.  Slightly press the batter and bake for 12 minutes.  Remove the batch form the oven and let it cool on the pan for another 5 minutes before transferring onto a wire rack.

Source : Kusina ni Teds

Red Velvet Cookies

0 comments

INGREDIENTS:
2 sticks (½ cup) of unsalted butter (room temp.)
1 cup of sugar
1 egg
1 Tbsp. vanilla extract
Optional:  1 Tbsp. buttermilk
red gel food coloring
1 Tbsp. cocoa powder
1 tsp. salt
2 ½ cups of flour

Additional flour for rolling
cookie cutters
Optional for finishing:  about 1 cup of melted white chocolate, frosting, sugars or sprinkles, etc.

DIRECTIONS:
DIRECTION

1. In a mixing bowl, (either by hand, or using a paddle attachment in a stand mixer), cream the butter and sugar. Add the egg and mix well.  Add the buttermilk, (if using), vanilla, and the cocoa powder. Start adding in some red gel coloring, (about 1/8 t. to start), and add as much as necessary to get the desired color you wish. Add in the salt, and about ½ the flour until dough begins to form. Mix in the rest of the flour. 

2. Remove the dough from the bowl, form in a disc, and wrap in plastic wrap well. Place in the refrigerator to chill for 3-4 hours, or overnight.

3. When ready to roll out cookies, remove the dough from the refrigerator, and allow to set for about 10 minutes. Prep your cookie trays by lining them with parchment paper or a silicone mat. When ready, on a clean and floured surface, roll out the dough to about ½ inch thick. Use additional flour if necessary. Cut out your cookies, and place them on the lined cookie trays. You could also dip the text side of the cookie in plain sugar for extra "sparkle"! Repeat until all dough has been used. Place the trays in the refrigerator for about 10-15 minutes to chill.

4. Preheat oven to 350ºF. Remove the trays from the oven, and bake at 350ëF for 10-14 minutes. Remove from the oven and allow to cool. 

5. If you would like to add decorations, simply melt your chocolate according to package directions, place the melted chocolate in a parchment triangle, and pipe on whatever design you like! You could also use royal icing, or even purchased frosting in a can. You could give these away as gifts/ treats, or serve on a platter for a party, or store in an airtight container for 1-2 weeks.

Source: Red Rocks The Kitchen

How to make embossed teddy bear fondant cupcake toppers


I loved making the fondant. So I came up with these sweet teddy bear cupcake toppers. I have made them in pink and blue and they are just perfect for a baby shower.

This is what I use:
Rolled fondant icing
Tylo powder
Rolling pin
Tylo glue
Small brush
Gel paste colors
Small blossom cutter with ejector (PME)
Teddy bear embosser from the Cradle 3D set (PatchWork Cutters)
Round cookie cutter (40mm)
Round scallop cookie cutter 2 1/4″ (58mm)
Round Piping tip no 2
Round piping tip with a 10mm opening
A little cornstarch for dusting and a small knife (not showing) if you want to make the tiny leaves on the girl cupcake toppers

Start adding some tylo powder to your white base. This will help the cupcake toppers to hold the shape better when they are placed in the frosting.

Step 1:
Roll out the white fondant to a 3 mm thickness and cut out circles with the scallop cookie cutter. Place them on a lightly cornstarch dusted tray as you go.
Step 2:
Take the round piping tip and “cut out” a small hole in each of the scallops.

Step 3:
Use another color of rolled fondant for the center of the cupcake toppers and roll out the fondant to a 2mm thickness. Cut out circles with the 40mm cookie cutter.

Step 4:
Use the large teddy bear embosser from the Patchwork cutter Cradle set and emboss the “center circle”.

Step 5:
Next brush a little tylo glue on the back of the embossed circle and place it in the middle of the white base.

Step 6:
If you like, you can glue on a couple of small blossoms and tiny leaves for the girl cupcake toppers.

TIP! I make the leaves out of tiny pieces of rolled fondant. Roll them into a small tear drop shape and make a little vein with a small knife.

Step 7:
For the boys, I have made a small ball. Roll out your fondant thinly. Use the round piping tip with the 10mm opening and cut out some dots. Use the end of the no 2 piping tip and emboss the middle of the ball.

Step 8:
Attache the small ball with a little brush of tylo glue.

Let the cupcake toppers dry thoroughly before use.

Happy Caking!

How To Make Tiny Flower Pot Cakes


Sometimes you want to create a dessert that is both a show stopper and is deceptively easy. Well, these teeny weeny flower pot cake bites are just the thing.

Using a chocolate mold makes them fool proof and dirt “brownie” filling tricks the eye but couldn’t be simpler. Use pre made royal icing flowers for the topper or pipe your own if you’re feeling ambitious. Either way, it’s the perfect treat to wow your guests.

Here’s what you’ll need:

Flower Pot Chocolate Mold
Orange Candy Coating Discs
Paintbrush
Store Bought Brownies (with no icing) or Chocolate Cake Pop Filling
Chocolate Store Bought Icing in a Piping Bag
Ready-to-Use Royal Icing Flowers or Fondant Flowers

Paint And Fill The Pots

Start by crumbling up the brownies and set them aside in a bowl.


Then, in a microwave safe bowl, heat some orange candy coating discs on half power. Remove after 30 seconds and stir. Continue to heat and stir in 30 second intervals until the discs are melted. (Be careful to not overheat the discs because they will burn).


Use a paintbrush to coat each cavity of the flower pot mold. Use a dabbing motion if paint strokes are leaving too many thin spots. (Reheat the coating as necessary because it may get firm if you are working slowly).

Place the mold in the fridge for 5 minutes. Remove it from the fridge, hold it up to the light and then touch up any thin spots with additional coating so that you have a solid shell to put filling in.


On the back of your royal icing flower, pipe a dollop of icing and then adhere the flower to the top of the cake. Accent with leaves or additional flowers.


And there you have it! Cutie and Yummy... Happy Caking!


Source: thecakegirls

How to Pipe Using a Round Tip

There are endless possibilities when it comes to decorating a cake, this video tutorial will demonstrate various piping techniques using 1A or commonly called the round tip. Source: Martha Stewart

How to Crumb-Coat a Cake

This simple video demonstrates how you can easily frost your cake. The first stage is called "crumb coat" wherein a thin layer of icing is spread on a cake.

Source: Martha Stewart

Chocolate Tablea Cupcakes


The brown butter muscovado glaze adds the sweet notes to this decadent cupcake.

Makes 2 1/2 dozen cupcakes
Prep Time 20 minutes
Baking Time 20-22 minutes

¾ cup tablea chocolate,  finely ground
¼ cup cocoa powder, sifted
240 ml boiling water
¼ cup yogurt, at room temperature
¾ cup full cream milk, at room temperature
1 ¾ cup all-purpose flour 
1 ½ teaspoon baking soda
¼ teaspoon salt
½ cup butter, softened
1 ½ cup white sugar
3 tsp vanilla extract
3 large eggs, at room temperature
⅓ cup walnuts, toasted and chopped (optional)

For the brown butter muscovado glaze:
½ cup salted butter
1 cup muscovado sugar
3 tablespoons milk
2 cups powdered sugar, sifted


1. Make the cupcakes: Preheat oven to 350ºF. Line a muffin pan with cupcake liners. In a bowl, mix the tablea chocolate and cocoa powder together. Pour the hot water of the chocolate mixture, mix to combine. Refrigerate for 15 minutes or until it is at room temperature.

2. In a separate bowl, mix the yogurt and the milk together. Set aside.

3. In a medium sized bowl, sift the flour, baking soda, and salt together and mix well with a wire whisk. Set aside.

4. In a large mixing bowl, cream the butter, sugar, and vanilla on medium speed until light and fluffy. Add the eggs one by one, beating for 20 seconds after each addition or until just combined.

5. Slowly pour the chocolate mixture into the egg mixture while beating on medium speed until just combined. Do not overmix.

6. Add half of the flour mixture into the chocolate mixture and beat on low speed until combined. Add half of the milk mixture onto the chocolate mixture and beat on low speed until combined. Repeat with the rest of the ingredients. Do not overmix.

7. Pour the batter evenly into a prepared cupcake pan and bake for 20-22 minutes or until the cakes are firm to the touch. Let the cupcakes cool completely on a wire rack, about 1 hour.  

8. Make the glaze: In a medium-sized saucepan, melt the butter over low heat. Once it is melted, it will start bubbling and will start slowly browning. Let the butter brown for 4 to 5 minutes; watch it carefully because it can burn.

9. Once the butter is browned, add the muscovado sugar and constantly stir over low heat until the sugar is melted.

10. Add the milk and bring the mixture up to a boil, constantly stirring. Take it off the heat.

11. Let the mixture stand for 5 minutes, then gradually add the powdered sugar until it becomes a smooth spreadable glaze. Glaze the cupcakes as desired. If using, sprinkle toasted walnuts over the glaze immediately.  


Source: Yummy

Yema Chiffon Cake


Glaze a chiffon cake with an all-time fave: yema frosting!

Makes 1 (6-inch) 2-layer square cake or 1 (6-inch) 2-layer round cake 
Prep Time 15 minutes
Baking Time 40-45 minutes


4  egg whites
¼ cup white sugar
¼ teaspoon cream of tartar
1 ¼ cups flour
1 teaspoon baking powder
½ teaspoon salt
¼ cup white sugar
4 egg yolks
⅓ cup full cream milk
1 teaspoonvanilla
¼ cup vegetable oil
Grated zest of 1 lemon


For the yema filling: 
14 oz condensed milk
3  eggs yolks
½ teaspoon salt
½ teaspoon vanilla
Grated cheese, for garnish (optional)

1.  Position a rack in the center of the oven and preheat at 350ºF. Line the bottom of a 6-inch square cake pan with parchment paper.

2.  To make the chiffon cake, place the egg whites and cream of tartar in a clean mixing bowl and beat for 2 minutes or until they reach soft peaks. Put mixer on medium speed: slowly add sugar and whip for another 2 minutes until the whites are glossy and still hold soft peaks.

3.  In a separate bowl, combine the flour, baking powder, salt, and sugar and mix well with a wire whisk.

4.  In a large mixing bowl, beat the egg yolks, milks, vanilla, oil, and lemon zest until they are combined. Add the flour mixture and beat on medium until everything is well incorporated. 

5.  Using a rubber spatula, gently fold about ⅓ of the whipped whites into the flour mixture to lighten up the batter. Then gently fold in the remaining egg whites. Do not overmix. 

6.  Spread the batter evenly in your prepared pan and bake for 40-45 minutes or until the top springs back when pressed lightly and the top of the cake doesn't stick to your fingertips. Let the cake rest for a minute in the pan before turning it out to cool on a wire rack. Gently peel off the parchment and let the cake cool to room temperature.

7.  Make the yema filling: combine the condensed milk, egg yolks, salt, and vanilla in a medium saucepan and cook over low heat for 10 minutes or until the mixture thickens into a smooth and spreadable filling. 

8.  Cut through the cake into two even layers. Spread filling onto the first layer of cake and place the second layer of cake on top. Spread the rest of the yema filling on top of the cake and over the sides. Let the cake set in the refrigerator for an hour before serving. If desired, sprinkle grated cheese of the top of the cake.  


Source: Yummy.ph

Dark Chocolate Crinkles


Ingredients:

¼ cup black cocoa powder plus ½ cup cocoa powder
¾ cups vegetable oil
2 cups sugar
4 large eggs
1 tablespoon vanilla extract
2 1/3 cups all-purpose flour
2 teaspoons baking soda
1 teaspoon salt
1 cup confectioner’s sugar

Instructions:

  1.  In the bowl of an electric mixer with a whisk attachment, combine cocoa, oil and sugar. Add eggs and vanilla and mix until well combined.
  2. In a separate bowl, combine all-purpose flour, baking soda, and salt.
  3. Gradually add to the cocoa mixture and stir until just combined.
  4. Place the mixture in the refrigerator for at least an hour or until the dough is firm before using.
  5. Preheat oven to 350°F.
  6. Shape the dough into ¾-inch balls and roll in the confectioner’s sugar to coat completely.
  7. Place the balls in a lightly greased cookie sheet or a cookie sheet lined with parchment paper. Arrange the balls about 2 inches apart.
  8.  Bake the cookies until puffed and cracked on the top, about 10-12 minutes.
  9. Cookies should look undone and still soft in the center. The internal heat will cook the cookies while cooling down and will keep them moist and chewy on the inside and crisp on the outside. Cool completely.

Tip

Black cocoa powder is a type of alkalized, Dutch-processed cocoa. It is available at specialty baking supply stores like SweetCraft and Chocolate Lovers. To make the usual chocolate crinkles, just use ¾ cup cocoa powder.

Brazo de Mercedes


INGREDIENTS:

10 large eggs
1/2 tsp cream of tartar
1 tsp pure vanilla extract
3/4 c sugar
3 Tbsp confectioners’ sugar
14 oz sweetened condensed milk

INSTRUCTIONS:

  1. Separate the egg whites from the yolk.
  2. In a bowl, combine egg whites and cream of tartar. Beat using an electric mixer until soft peaks form.
  3. Make the meringue by gradually adding the granulated sugar while mixing the ingredients. Mix until the texture is semi-firm.
  4. Preheat the oven to 350º Fahrenheit.
  5. Place wax paper on top of a cookie sheet or large rectangular baking pan and grease the surface.
  6. Place the meringue on top of the greased wax paper then spread evenly using a spatula.
  7. Bake the meringue for 20 to 22 minutes or until the color of the top part turns light to medium brown.
  8. While the meringue is in the oven, make the filling by combining the egg yolks and condensed milk in a small cooking pot. Cook the mixture on the stove (low heat) while continuously stirring until the texture becomes thick.
  9. Add the vanilla extract to the condensed milk and egg yolk mixture, turn off the heat, and mix thoroughly. Set aside.
  10. Remove the meringue from the oven and cool down for a few minutes.
  11. Sprinkle the confectioners sugar on top of the meringue then place wax paper on the top part of the meringue, place a similar sized baking pan or tray on top. Note: The meringue should now be in the middle of two baking trays.
  12. Flip the trays. The tray you just placed on top should now be under. Remove the baking tray that is now on top and the wax paper (you should now see the opposite side of the baked meringue) then spread the filling (cooked egg yolks, condensed milk, and vanilla extract mixture) over the meringue.
  13. Roll the meringue starting at the longest side. Make sure that the filling is rolled inward and in the center of the roll.
  14. Transfer to a serving plate, slice then serve.


Source : Foodipino

Photo Credit: kawalingpinoy.com

Maltesers Cake


INGREDIENTS:

 200g (1 cup, firmly packed) brown sugar
 185ml (¾ cup) milk
 125g butter, chopped
 115g (¾ cup) self-raising flour
 75g (½ cup) plain flour
 50g (½ cup) cocoa powder
 3 eggs, lightly whisked
 185g butter, extra, at room temperature
 345g (2 ¼ cups) icing sugar mixture
 95g (¾ cup) malted milk powder
 1 tablespoon milk, extra
 465g Maltesers

 Ganache
 300g dark cooking chocolate, finely chopped
 125ml (½ cup) thickened cream
 30g butter

DIRECTIONS:

1. Preheat oven to 160ºC. Grease a 20 cm round cake pan with butter. Line base and side with baking paper.

2. Place the brown sugar, milk and butter in a microwave-safe bowl. Cook in microwave on high, stirring every minute, for 4-5 minutes or until the butter melts and the mixture is smooth.

3. Use a balloon whisk to whisk the combined flour and cocoa powder into the butter mixture. Whisk in the egg. Pour into the prepared pan. Bake for 55 minutes or until a skewer inserted into the center comes out clean. Set aside in the pan for 5 minutes to cool before transferring to a wire rack to cool completely.

4. To make the ganache, place the chocolate, cream and butter in a microwave-safe bowl. Cook in microwave on high, stirring every minute, for 2-3 minutes or until the chocolate melts and the mixture is smooth.

5. Use an electric beater to beat the extra butter in a bowl until pale and creamy. Beat in the icing sugar, malted milk powder and extra milk until fluffy. Beat in 1 ½ tablespoons ganache.

6. Set the remaining ganache aside for 1 hour 30 minutes or until thick, glossy and spreadable.

7. Meanwhile, use a large serrated knife to cut the cake horizontally into four layers. Place the cake base on a platter. Spread with one-third of the icing. Continue layering with the remaining cake and icing, finishing with cake. Cover and place in the fridge for 1 hour 30 minutes to chill.

8. Spread the ganache evenly over the top and side of the cake. Decorate with Maltesers.


Source: Taste.com.au

Chocolate Strawberry Shortcakes


INGREDIENTS:

Chocolate shortcakes:
1 ½ cups all-purpose flour
½ cup unsweetened cocoa powder
1 tablespoon baking powder
½ cup sugar
½ tsp kosher salt
1 large egg
1 cup whipping cream
8 tablespoons unsalted butter, melted and cooled slightly
1 teaspoon pure vanilla extract

Strawberries:
1 ½ pounds ripe strawberries, hulled and sliced
¼ cup sugar
2 tablespoons fresh orange juice
2 tablespoons Grand Marnier or other orange liqueur

Whipped cream:
1 cup heavy whipping cream
1 teaspoon pure vanilla extract
2 tablespoons sugar

DIRECTIONS: 

1. In a bowl, stir together the strawberries, sugar, orange juice, and Grand Marnier. Set aside for 30 minutes to macerate.

2. Position a rack in the upper third of the oven and preheat the oven to 375°F. Line a baking sheet with parchment paper.

3. In a large bowl, sift together the flour, cocoa, and baking powder. Whisk in the sugar and salt. In another bowl, whisk together the egg, cream, butter, and vanilla. Stir the cream mixture into the flour mixture. 

4. Using a tablespoon, drop 6 to 8 shortcakes onto the prepared baking sheet, spacing the mounds evenly (the shortcakes will expand slightly as they bake).Bake the shortcakes until a toothpick inserted into the center comes out clean, about 15 to 18 minutes. Transfer to a rack and let cool.

5. To whip the cream: In the bowl of a mixer fitted with the whip attachment, on medium-high speed, beat the cream, sugar, and vanilla to medium-stiff peaks. Do not overbeat.

6. To serve, split the shortcakes horizontally. Top the bottom half with a big spoonful of strawberries (including some of the juices) and a big dollop of whipped cream. Top with the top layer of shortcake, and spoon some berries over the top. Top with more whipped cream, drizzle with some of the juices, and serve.


Source: Chow 

Caramel Filled Cupcakes with Whipped Caramel Frosting Recipe


Ingredients

1 yellow cake mix (I prefer Pillsbury)
3 whole eggs
½ cup water
⅓ cup oil
1 cup sour cream (8 ounces)
1 small box instant vanilla pudding

For the filling:

1 stick butter, melted
1 cup packed light brown sugar
1/4 cup milk
1 teaspoon pure vanilla extract
For the frosting:
2 sticks butter
1 cup packed dark brown sugar
⅓ cup heavy cream, or more if needed
16 oz. confectioners’ sugar (~ 4 cups)
1 teaspoon pure vanilla extract

Instructions

  1. For the cupcakes, thoroughly mix all ingredients together. Bake at 325° for about 18 minutes.
  2. Allow the cupcakes to cool while you make the filling (or use pre-made Caramel sauce from a jar, such as Smuckers). When cool, use an apple corer to remove the center and prepare for filling.
  3. To make the filling (if you're not using pre-made), add the butter, brown sugar and milk to a small saucepan. Heat until the butter melts and the sugar dissolves, about 3-5 minutes over medium heat. Remove from heat and stir in the vanilla extract. Allow to cool slightly and it will start to thicken. Spoon it into the cupcake holes.
  4. For the frosting, melt the butter in a saucepan over medium heat and add in the brown sugar and cream. Heat until it boils, then remove it from the heat and transfer to a mixing bowl. Slowly add in the confectioners sugar while mixing. Add the vanilla. Continue mixing until the frosting is completely cooled and is whipped up light and fluffy.
  5. Frost the cupcakes (I used a large round tip) and enjoy!!

Happy Caking!


Source: Cake Journal

Lemon Vanilla Cupcake


Ingredients

½ cup (120 grams) butter, room temperature
Note: I do not use unsalted butter, whenever I bake. but you can of course use unsalted butter if you prefer. (Just add ¼ tsp of salt to the recipe)
¾ cup (135 grams) white granulated sugar
3 eggs
Seeds from 1 vanilla bean
Zest from 1 large lemon
1 ½ cup (200 grams) all purpose flour
2 tsp baking powder
¼ cup (60 ml) milk or cream, room temperature
12 cup muffin pan
12 cupcake paper cases

Instructions

  1. Preheat oven to 350º F (175 C) Do not use the fan.
  2. In a bowl, mix together flour and baking powder with a whisk and set aside.
  3. Cream the following: butter, white sugar, eggs, vanilla seeds and the lemon zest. Using your hand or kitchen mixer. Cream until well combined. Scrape down the sides of the bowl when needed.
  4. Sift in half of the flour mixture and mix just until combined. Then add the milk and give the batter a quick mix before adding the last part of the flour mixture. Give the batter a final mix until it is smooth.
  5. Fill the cupcake paper cases ¾ full with the lemon vanilla batter and bake the cupcakes in the middle of the oven for about 20-25 minutes. Remember to check with a cake tester/toothpick to see if the cupcakes are done.
  6. Transfer the cupcakes from the pan to a cooling rack and let them cool completely before frosting.

Notes:

They are best freshly baked but can be stored in a air tight container for two days.

Source: Cake Journal

How To Make A Blue Velvet Naked Cake


To make this cake, you will need the following ingredients:

Vegan blue velvet cake:

2 1/4 cups all-purpose flour
1 1/4 cups sugar
1 1/2 cup soy milk or almond milk
3/4 cup light olive oil
1 tbsp vanilla extract (the best quality you can find!)
3/4 tsp baking soda
1/8 tsp salt
3 tbsp lemon juice
Blue gel coloring

Vegan buttercream icing:

3/4 cup shortening
3/4 cup vegan margarine
4 – 4 1/2 cups powdered sugar
1/4 cup almond milk or soy milk
1 tbsp vanilla extract (the best quality you can find!)
Yellow gel coloring

Decorating:

Fresh flowers
Blackberries
Tip 1M

These are the instructions for the blue velvet cake:

Step 1:
Add all the wet ingredients (milk, oil, vanilla extract and lemon juice) in a mixing bowl.


Step 2:
Mix everything until you have a fluffy mixture.


Step 3:
In a separate bowl, sift all the dry ingredients (flour, sugar, salt and baking soda). Dump the sifted dry ingredients into your bowl of wet mixture.


Step 4:
Mix everything until just combined.
DON’T overmix!


Step 5:
Add blue gel coloring in the batter and mix thoroughly with a wooden spoon.
Pour the batter in two 8×2 greased and floured round cake pans.
Bake at 350 degrees for 40-45 minutes or until an inserted toothpick comes out clean.


These are the instructions for the vegan icing:

Step 1:
In a mixing bowl, cream margarine and shortening until you have a light and creamy mixture with no lumps.


Step 2:
Add powdered sugar and milk and mix at low speed until you have a spreadable consistency. If you feel that your icing consistency is too thin, add some more powdered sugar to thicken it (1/4 cup at a time).
If you feel that your icing consistency is too thick, add some more milk to thin it out (1 tbsp at a time).


Step 3:
Finally, add yellow gel coloring and mix again.


Once your cakes and icing are prepared, assemble the cake…
Start off by leveling your cakes.
Place one cake on a cake board.
Use Tip 1M to frost the top of the cake and place some blackberries as well.
Place the other half of the cake on top of the icing and blackberries now.
Use Tip 1M again to frost the top of the cake.
Finally, just decorate the top with fresh flowers and blackberries.
And you are done!


Happy Caking! 


Source: Cake Journal

German Chocolate Cake


INGREDIENTS

For the cake:

    2   ounces Baker’s German’s Sweet Chocolate, coarsely chopped
    1   cup all-purpose flour
    ⅓   cup Dutch-process cocoa powder
    ¼  teaspoon baking soda
    ¼  teaspoon fine salt
    8   tablespoons unsalted butter (1 stick), at room temperature, plus more for          coating the baking dish
    1   cup granulated sugar
    2   large eggs, at room temperature
    1   large egg yolk, at room temperature
    1   teaspoon vanilla extract
    ½  cup low-fat buttermilk, at room temperature

For the filling:

    ¾  cup heavy cream
    ½  cup granulated sugar
    2   large egg yolks
    1¼ cups unsweetened coconut flakes, toasted and crumbled
    ¾  cup pecans, toasted and finely chopped
    3   tablespoons unsalted butter, cut into small pieces
    ¼  teaspoon fine salt

To assemble:

    Vanilla Buttercream Frosting, at room temperature

INSTRUCTIONS

For the cake: 

  1. Heat the oven to 350°F and arrange a rack in the middle. Coat a 13-by-9-inch baking dish with butter; set aside.
  2. Fill a small saucepan with 1 inch of water and bring it to a simmer over medium-high heat. Place the chocolate in a stainless steel or glass bowl, set the bowl over the simmering water (be sure it’s not touching the water), and stir until the chocolate is completely melted, about 3 to 5 minutes; set aside to cool slightly.
  3. Combine the flour, cocoa powder, baking soda, and salt in a large bowl and whisk to aerate and break up any lumps; set aside.
  4. In the bowl of a stand mixer fitted with a paddle attachment, cream the measured butter and sugar on medium-high speed until light in color and fluffy, about 4 minutes. Add the eggs, 1 at a time, then the egg yolk, beating after each addition until evenly incorporated. Stop the mixer and scrape down the sides of the bowl using a rubber spatula. Add the vanilla and melted chocolate and return the mixer to medium-high speed, mixing until evenly combined, about 30 seconds.
  5. Reduce the speed to medium low and add a third of the reserved dry ingredients. When just incorporated, add half of the buttermilk. Repeat, scraping down the bowl at least once and ending with the last third of the dry ingredients.
  6. Pour the batter into the prepared dish, smooth the top with the spatula, and bake until a toothpick inserted in the middle comes out with only a few crumbs, about 35 minutes. Cool completely in the pan on a wire rack, about 1 hour. Meanwhile make the filling.

For the filling:

  1. Combine the cream, sugar, and egg yolks in a medium saucepan over medium heat, stirring constantly until the mixture thickens and coats the back of the spoon, about 8 minutes.
  2. Transfer to a medium bowl, add the remaining ingredients, and stir until the butter has melted and is evenly incorporated. Let cool to room temperature.

To assemble:

  1. Once the cake has cooled, carefully transfer it to a cutting board and slice it into thirds (the pieces should measure about 4 inches wide by 9 inches long), trimming as necessary to make the sections as even as possible.
  2. Spread about a third of the filling evenly over the top of 1 piece of cake, and another third of the filling over the top of a second piece. Stack the 2 pieces and place the last, unadorned piece on top. Set the last third of the filling aside.
  3. Using about a third of the vanilla buttercream, frost the sides and top of the cake. (Don’t worry about looks at this point—this is just a base coat, or crumb layer, and it will be covered up later.) Place the cake in the freezer for about 10 minutes, or the refrigerator for about 20 minutes, until the frosting is set up and slightly hard. Evenly spread the remaining frosting over the top and sides of the cake, then evenly spread the remaining third of the filling on top of the cake.

Source: Chow

Red Velvet Crinkles


INGREDIENTS

3 cups                       All Purpose Flour
¼ cup                       Unsweetened Cocoa Powder
2 teaspoons               Baking Powder
¾ teaspoons              Salt
¾ cup                       Softened Butter
1 ⅓ cup                     Sugar
3 pieces                     Eggs
1 ½ teaspoons           Vanilla Extract
5 teaspoons               Liquid Food Coloring
1 Tablespoon             White Vinegar
¼ teaspoon               Baking Soda
1 cup                        Chocolate Chips
1 cup                        Icing Sugar

DIRECTIONS
DIRECTIONS
  1. Preheat oven to 190 degrees Celsius.
  2. Combine flour, cocoa powder, baking powder and salt.  Mix using a wire whisk until everything is incorporated.  Set aside.
  3. In a separate bowl, beat the butter using an electric mixer for 3 minutes.  Gradually add the sugar and beat until you have a pale yellow mixture.  Add egg one at a time beating 3 minutes upon each addition.  Add vanilla extract and food color and beat for another 3 minutes. 
  4. Mix in the flour mixture a half cup at a time.  Be sure that the flour mixture is well incorporated into the batter.
  5. Combine vinegar and baking soda and add to the batter.  Mix for another 2 minutes.
  6. Add in the chocolate chips and mix using a wooden spoon or a spatula. 
  7. Refrigerate for at least four hours or overnight.  This is an important step.  Like breads, we want our batter to rest.  Cold batter is also easy to work with compared to room temperature sticky batter.  So be patient.
  8. Sift icing sugar in a bowl.  Scoop the red velvet crinkle batter batter using a 1 ounce ice cream scooper.  Roll it on the icing sugar and place on a baking pan lined with baking paper.  Slightly press the batter and bake for 12 minutes.  Remove the batch form the oven and let it cool on the pan for another 5 minutes before transferring onto a wire rack.

Source : Kusina ni Teds

Red Velvet Cookies


INGREDIENTS:
2 sticks (½ cup) of unsalted butter (room temp.)
1 cup of sugar
1 egg
1 Tbsp. vanilla extract
Optional:  1 Tbsp. buttermilk
red gel food coloring
1 Tbsp. cocoa powder
1 tsp. salt
2 ½ cups of flour

Additional flour for rolling
cookie cutters
Optional for finishing:  about 1 cup of melted white chocolate, frosting, sugars or sprinkles, etc.

DIRECTIONS:
DIRECTION

1. In a mixing bowl, (either by hand, or using a paddle attachment in a stand mixer), cream the butter and sugar. Add the egg and mix well.  Add the buttermilk, (if using), vanilla, and the cocoa powder. Start adding in some red gel coloring, (about 1/8 t. to start), and add as much as necessary to get the desired color you wish. Add in the salt, and about ½ the flour until dough begins to form. Mix in the rest of the flour. 

2. Remove the dough from the bowl, form in a disc, and wrap in plastic wrap well. Place in the refrigerator to chill for 3-4 hours, or overnight.

3. When ready to roll out cookies, remove the dough from the refrigerator, and allow to set for about 10 minutes. Prep your cookie trays by lining them with parchment paper or a silicone mat. When ready, on a clean and floured surface, roll out the dough to about ½ inch thick. Use additional flour if necessary. Cut out your cookies, and place them on the lined cookie trays. You could also dip the text side of the cookie in plain sugar for extra "sparkle"! Repeat until all dough has been used. Place the trays in the refrigerator for about 10-15 minutes to chill.

4. Preheat oven to 350ºF. Remove the trays from the oven, and bake at 350ëF for 10-14 minutes. Remove from the oven and allow to cool. 

5. If you would like to add decorations, simply melt your chocolate according to package directions, place the melted chocolate in a parchment triangle, and pipe on whatever design you like! You could also use royal icing, or even purchased frosting in a can. You could give these away as gifts/ treats, or serve on a platter for a party, or store in an airtight container for 1-2 weeks.

Source: Red Rocks The Kitchen
 

Ryken Chocolates Copyright 2009 Sweet Cupcake Designed by Ipiet Templates Image by Tadpole's Notez