Wednesday, 22 April 2015

How to make embossed teddy bear fondant cupcake toppers

0 comments


I loved making the fondant. So I came up with these sweet teddy bear cupcake toppers. I have made them in pink and blue and they are just perfect for a baby shower.

This is what I use:
Rolled fondant icing
Tylo powder
Rolling pin
Tylo glue
Small brush
Gel paste colors
Small blossom cutter with ejector (PME)
Teddy bear embosser from the Cradle 3D set (PatchWork Cutters)
Round cookie cutter (40mm)
Round scallop cookie cutter 2 1/4″ (58mm)
Round Piping tip no 2
Round piping tip with a 10mm opening
A little cornstarch for dusting and a small knife (not showing) if you want to make the tiny leaves on the girl cupcake toppers

Start adding some tylo powder to your white base. This will help the cupcake toppers to hold the shape better when they are placed in the frosting.

Step 1:
Roll out the white fondant to a 3 mm thickness and cut out circles with the scallop cookie cutter. Place them on a lightly cornstarch dusted tray as you go.
Step 2:
Take the round piping tip and “cut out” a small hole in each of the scallops.

Step 3:
Use another color of rolled fondant for the center of the cupcake toppers and roll out the fondant to a 2mm thickness. Cut out circles with the 40mm cookie cutter.

Step 4:
Use the large teddy bear embosser from the Patchwork cutter Cradle set and emboss the “center circle”.

Step 5:
Next brush a little tylo glue on the back of the embossed circle and place it in the middle of the white base.

Step 6:
If you like, you can glue on a couple of small blossoms and tiny leaves for the girl cupcake toppers.

TIP! I make the leaves out of tiny pieces of rolled fondant. Roll them into a small tear drop shape and make a little vein with a small knife.

Step 7:
For the boys, I have made a small ball. Roll out your fondant thinly. Use the round piping tip with the 10mm opening and cut out some dots. Use the end of the no 2 piping tip and emboss the middle of the ball.

Step 8:
Attache the small ball with a little brush of tylo glue.

Let the cupcake toppers dry thoroughly before use.

Happy Caking!

Tuesday, 21 April 2015

How To Make Tiny Flower Pot Cakes

0 comments

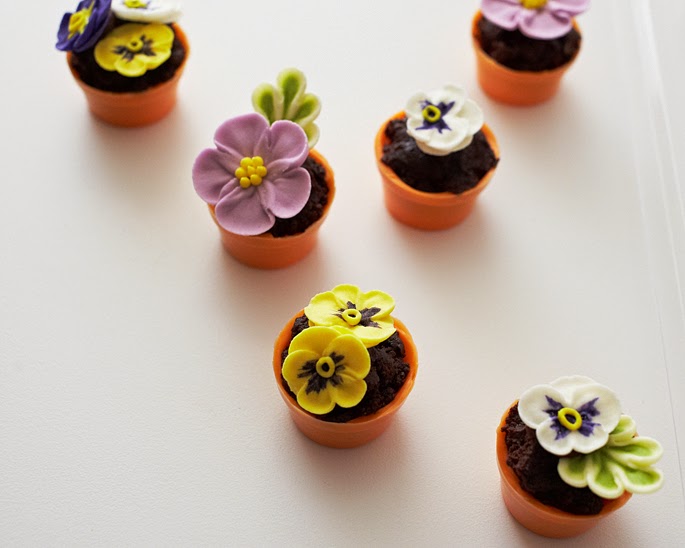
Sometimes you want to create a dessert that is both a show stopper and is deceptively easy. Well, these teeny weeny flower pot cake bites are just the thing.

Using a chocolate mold makes them fool proof and dirt “brownie” filling tricks the eye but couldn’t be simpler. Use pre made royal icing flowers for the topper or pipe your own if you’re feeling ambitious. Either way, it’s the perfect treat to wow your guests.

Here’s what you’ll need:

Flower Pot Chocolate Mold
Orange Candy Coating Discs
Paintbrush
Store Bought Brownies (with no icing) or Chocolate Cake Pop Filling
Chocolate Store Bought Icing in a Piping Bag
Ready-to-Use Royal Icing Flowers or Fondant Flowers

Paint And Fill The Pots

Start by crumbling up the brownies and set them aside in a bowl.


Then, in a microwave safe bowl, heat some orange candy coating discs on half power. Remove after 30 seconds and stir. Continue to heat and stir in 30 second intervals until the discs are melted. (Be careful to not overheat the discs because they will burn).


Use a paintbrush to coat each cavity of the flower pot mold. Use a dabbing motion if paint strokes are leaving too many thin spots. (Reheat the coating as necessary because it may get firm if you are working slowly).

Place the mold in the fridge for 5 minutes. Remove it from the fridge, hold it up to the light and then touch up any thin spots with additional coating so that you have a solid shell to put filling in.


On the back of your royal icing flower, pipe a dollop of icing and then adhere the flower to the top of the cake. Accent with leaves or additional flowers.


And there you have it! Cutie and Yummy... Happy Caking!


Source: thecakegirls

Sunday, 19 April 2015

How to Pipe Using a Round Tip

0 comments
There are endless possibilities when it comes to decorating a cake, this video tutorial will demonstrate various piping techniques using 1A or commonly called the round tip. Source: Martha Stewart

How to make embossed teddy bear fondant cupcake toppers


I loved making the fondant. So I came up with these sweet teddy bear cupcake toppers. I have made them in pink and blue and they are just perfect for a baby shower.

This is what I use:
Rolled fondant icing
Tylo powder
Rolling pin
Tylo glue
Small brush
Gel paste colors
Small blossom cutter with ejector (PME)
Teddy bear embosser from the Cradle 3D set (PatchWork Cutters)
Round cookie cutter (40mm)
Round scallop cookie cutter 2 1/4″ (58mm)
Round Piping tip no 2
Round piping tip with a 10mm opening
A little cornstarch for dusting and a small knife (not showing) if you want to make the tiny leaves on the girl cupcake toppers

Start adding some tylo powder to your white base. This will help the cupcake toppers to hold the shape better when they are placed in the frosting.

Step 1:
Roll out the white fondant to a 3 mm thickness and cut out circles with the scallop cookie cutter. Place them on a lightly cornstarch dusted tray as you go.
Step 2:
Take the round piping tip and “cut out” a small hole in each of the scallops.

Step 3:
Use another color of rolled fondant for the center of the cupcake toppers and roll out the fondant to a 2mm thickness. Cut out circles with the 40mm cookie cutter.

Step 4:
Use the large teddy bear embosser from the Patchwork cutter Cradle set and emboss the “center circle”.

Step 5:
Next brush a little tylo glue on the back of the embossed circle and place it in the middle of the white base.

Step 6:
If you like, you can glue on a couple of small blossoms and tiny leaves for the girl cupcake toppers.

TIP! I make the leaves out of tiny pieces of rolled fondant. Roll them into a small tear drop shape and make a little vein with a small knife.

Step 7:
For the boys, I have made a small ball. Roll out your fondant thinly. Use the round piping tip with the 10mm opening and cut out some dots. Use the end of the no 2 piping tip and emboss the middle of the ball.

Step 8:
Attache the small ball with a little brush of tylo glue.

Let the cupcake toppers dry thoroughly before use.

Happy Caking!

How To Make Tiny Flower Pot Cakes


Sometimes you want to create a dessert that is both a show stopper and is deceptively easy. Well, these teeny weeny flower pot cake bites are just the thing.

Using a chocolate mold makes them fool proof and dirt “brownie” filling tricks the eye but couldn’t be simpler. Use pre made royal icing flowers for the topper or pipe your own if you’re feeling ambitious. Either way, it’s the perfect treat to wow your guests.

Here’s what you’ll need:

Flower Pot Chocolate Mold
Orange Candy Coating Discs
Paintbrush
Store Bought Brownies (with no icing) or Chocolate Cake Pop Filling
Chocolate Store Bought Icing in a Piping Bag
Ready-to-Use Royal Icing Flowers or Fondant Flowers

Paint And Fill The Pots

Start by crumbling up the brownies and set them aside in a bowl.


Then, in a microwave safe bowl, heat some orange candy coating discs on half power. Remove after 30 seconds and stir. Continue to heat and stir in 30 second intervals until the discs are melted. (Be careful to not overheat the discs because they will burn).


Use a paintbrush to coat each cavity of the flower pot mold. Use a dabbing motion if paint strokes are leaving too many thin spots. (Reheat the coating as necessary because it may get firm if you are working slowly).

Place the mold in the fridge for 5 minutes. Remove it from the fridge, hold it up to the light and then touch up any thin spots with additional coating so that you have a solid shell to put filling in.


On the back of your royal icing flower, pipe a dollop of icing and then adhere the flower to the top of the cake. Accent with leaves or additional flowers.


And there you have it! Cutie and Yummy... Happy Caking!


Source: thecakegirls

How to Pipe Using a Round Tip

There are endless possibilities when it comes to decorating a cake, this video tutorial will demonstrate various piping techniques using 1A or commonly called the round tip. Source: Martha Stewart
 

Ryken Chocolates Copyright 2009 Sweet Cupcake Designed by Ipiet Templates Image by Tadpole's Notez